
Configuring the Creation Panel #
When you add a scenario in the workspace, the Step Management screen appears as shown below.


① Displayed if changes in the scenario, but unsaved.
② Create a new default step.
➂ You can view, add, modify, and delete scenario properties. See “Setting Scenario Properties” for more information.
④ Run the scenario from beginning to end.
⑤ Save the scenario.
⑥ Save the scenario as a zip file locally. You can copy this zip file and load it from another PC to continue working.
⑦ The sequence or list of test steps in this scenario.
⑧ Minimize the Step Properties window. To restore the original pane size of the Step Properties windows, click the tab at the bottom.
⑨ Display the attributes of the selected step.
The properties of the step windows shows different options depending on the selected action. Please check the action list for details.
Writing Scenario #
Scenarios can be created in the following order.
- Creating a step
- Analyze your screen using Screen Analysis tool
- Select a screen element and add it to the step
- Test a step or sequence of steps you created
- Save Scenario
If you go from number 1 to 3, one step is created, and the sequence of steps created in the scenario panel complete one scenario.

1. Creating Steps #
Steps are divided into two types: the primary step and the substep(Child).
① Create Basic Step
You can create it by clicking the ‘+’ button on the top toolbar of the Scenario Creation panel. The newly created step is added to the bottom of the step list, and the default action is “Touch”.
Please refer to the link below for a list of actions and functions that can be selected in the step.
-> Action List
In addition to using the upper toolbar, you can also create a step using the Context menu that appears by right-clicking on the step.
If a step already exists, click “Insert above” if you want to create a step right in front of it, or click “Insert bellow” if you want to create a step right after it.
② Creating substep(Child)
Control items (except Loop Wait For) can have a sub-step(Child Steps).
③ You can change the order of steps by drag&drop the icons up and down of the steps. (you can also drag& drop a specific step into the sub-step.)
④ To modify the step name
When you create a step, default “Unnamed” step name is given.
Please note that distinguished or meaningful step name help you tremendously to maintain your scenario later on. Step name can be easily changed by clicking the Step Name field.


Example of two scenarios: one is difficult to manage because the step name is not modified, and the other scenario is easier manage because of meaningful name.
2. Analyze your screen using Screen Analysis tool #
Run an analysis of the app screen to be added to step. Screen analysis is performed by clicking ‘Screen analysis’ button in the upper right corner of the device panel.

Various screen analysis tools can be used for optimal scenario creation. Our default analysis tool is an OD (Object Detection).
See below for a detailed description of the various screen analysis tools.
-> List of screen analysis tools
3. Select a screen element to add it to the step
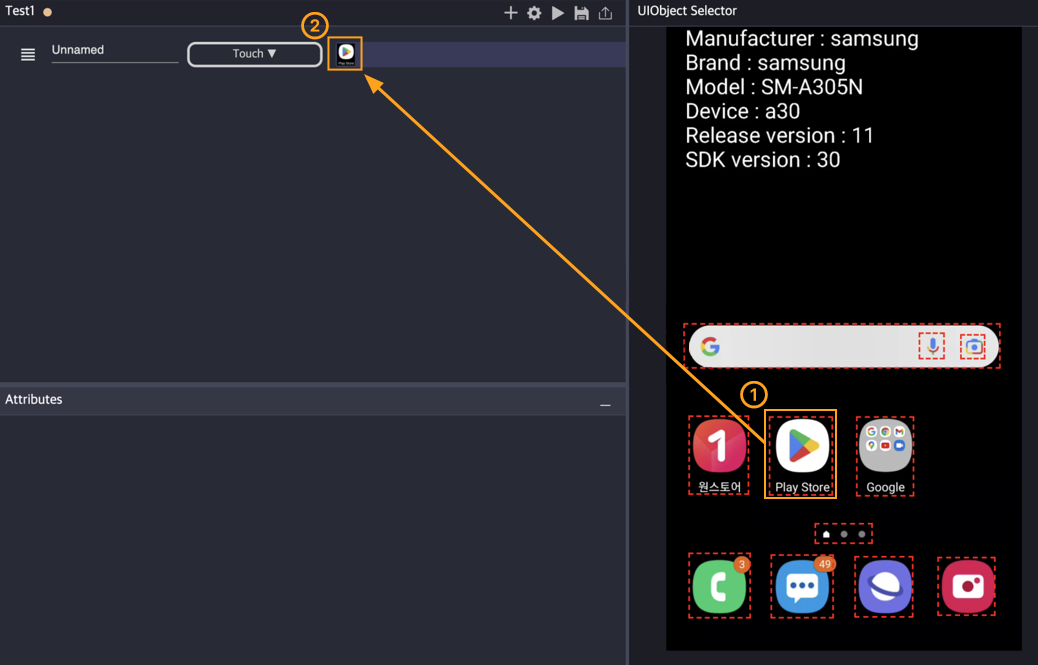 #
#
From the screen analysis results, select the screen element and drag it to the blank area (tail side) of step.
When this step get to run, the element you dragged is visually searched from the screen and action will be taken on that element accordingly. Sometimes an element you want to operate cannot be identified by the default screen analysis tool. In this case, you can also use the ” Crop Image ” analysis tool to specify and import the screen element directly.
#
4. Test a step or sequence of steps you created #
You can run a completed scenario to see if the steps work as you wish.
To run the scenario, select “Play only” or “Play until the end” from the Context menu in Step.
(1) Play only
Use it when you want to run a specific step only. When you finish running the selected step, the test is aborted without proceeding to the next step.
(2) Play until the end
Use when you want to run from a specific step to the last step. In this case, it runs in order from the selected step to the last step of the scenario.

In Stego, writing test scenario is compiling a series of test steps. When one step is complete and tested, move onto the next step. As you complete the steps one by one, a scenario will be completed.
#
5. Save Scenario #
If the scenario has been modified and needs to be saved, a yellow circle icon is displayed next to the scenario name at the top of the creation panel.
(Save button)
To save it, click the save icon in the toolbar at the top of the creation panel or type the ⌘+S shortcut to save the current state.
Caution) Scenarios are not automatically saved. Please save scenarios from time to time during writing.
Executing Scenario #
There are 3 different ways to execute the scenario you created.
To run from beginning to end #

Click the Run icon on the toolbar at the top of the creation panel, or enter the shortcut ⌘+D to run in order from the first to the last step.
To run only one step #
If you only want to run the steps you created while creating the scenario, right-click the step and click “Play only” on the Context menu.
To run from middle to end #
If you want to run from the middle to the last step of the scenario, right-click the middle step and click “Play until the end” in the Context menu.

Disabling #
When the scenario is running, the all icons in the creation panel toolbar are disabled and the stop icon appears. If you want to stop the running scenario, click the ‘Stop ‘ button.
Checking Output #
You can check the results of your tests and export logs in the Output section.
![]()
① Help: You can view the latest 100 test results.
② Export Play Result: You can save the results of your tests, along with the screenshots, as logs.
③ Minimize Window: Minimize the window. You can bring it back by clicking on the Output button at the bottom.
To export the result list #
Step 1. Click the ‘Export Play Result’ button to export the results.
Step 2. Exported file will be compressed as a .zip file including a log and result folder inside. In the result folder, you can find screenshots and json file which contains detailed information of each step listed in the order of scenario execution.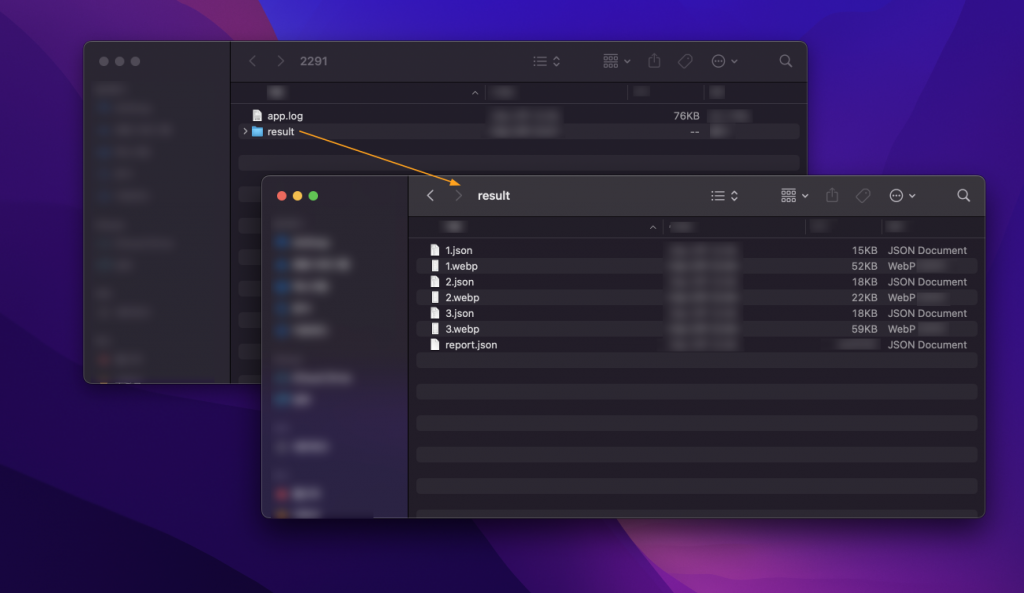
Export #
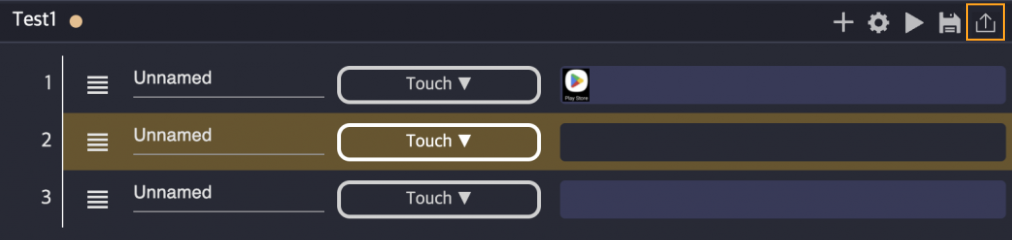

If you need to share your scenario with others or want to back it up, use the export function. Export can be done by clicking the icon on the creation panel toolbar.
When you export a scenario, it is saved as a zip file on your local disk.
If you share a saved zip file to another computer, you can open the zip file using the Import function from Stego of another computer.
For a detailed description of the Import feature, see the topic on the “Scenario loading” page.
Setting Scenario Properties #
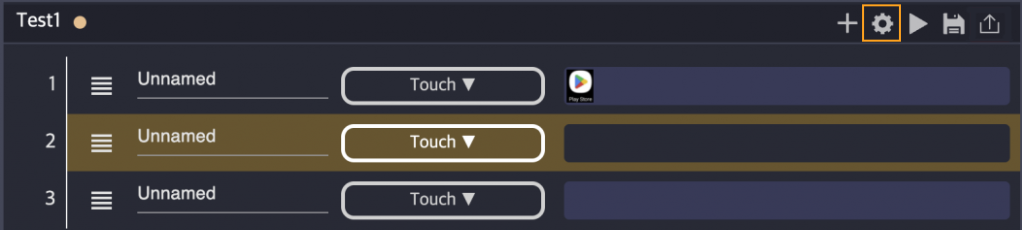

Click the cogwheel icon on the creation panel toolbar to display the scenario properties window as shown below.
User Variable #
One can setup User Variable to store a specific value that are expected to be frequently used in scenarios.
“Store Value” of Actions has a similar function, yet the difference is the life cycle of the value defined. For example, that value of “Store Value” is dynamically filled if action is actually executed. On the other hand, User Variable can be predefined at global scope (or at the beginning) so that it can used in any step while the scenario is running.
Creating a User Variable #
Click ‘ add ‘ button in the Scenario Properties window to display a text box where you can enter new keys and values.
Enter key and value in the displayed text box, and then click ‘ save ‘ button to create a User Variable.

To modify/delete User Variable #
User Variable allows you to add any specific ‘key’ and ‘value’. Once you finish, make sure you click ‘save’ button to save the modification.

The variable can be deleted by clicking the ‘-‘ button to the right of the variable, and then clicking ‘save’ button.
CAUTION) You must click the ‘save’ button to save the user setting variables for your work to take effect.
Using User Variable #
You can use it by entering the key value of the variable where you need to use the variable you created.
Note that when you want to use the value of the specific key contains, you can use it like “${key}” (i.e. special dereferencing form to obtain the value of the “key”). This will distinguish between plain characters “key” from the User Variable.
From the following example, to use the value of the variable stored at ‘age’, enter ${age} to extract the value stored (In this case, saved value is 34).
Caution) When using a variable, make sure that the key value of the variable is ${key}.

User Variables for Shared Scenarios #
Any User Variable used in the share scenario will also be added to the User Variable List of the master (caller) scenario automatically.

However to use User Variables defined in a shared scenario, you must set the User Variable to “Export Variable” action in the shared scenario before you can use the variables in the parent scenario.


For a detailed description of “Export Variable”, please refer to the “Export Variable” page .
Set Step Properties #
A step is composed of an action on specific target element. Also, you can specify each element to have various internal values to enable more sophisticated scenario testing.
Modifying action properties #
① Clicking on the empty space in a step activates the Attributes panel at the bottom where you can change the properties of the action set in the step.
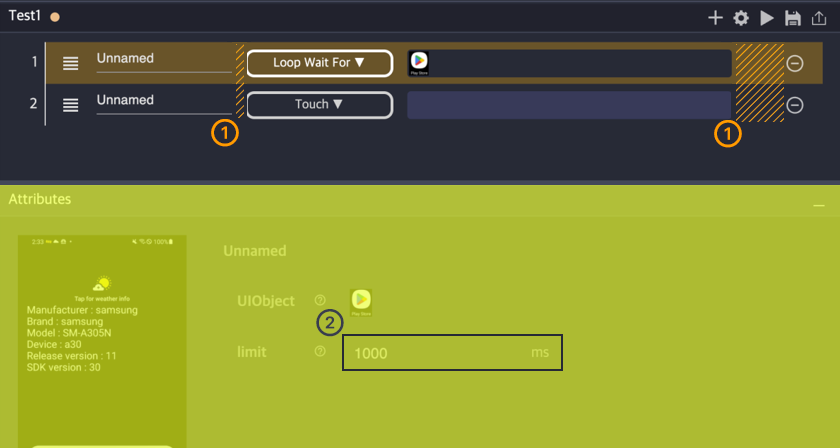
② The list of properties depends on the type of action.
For more information, see each action item in the Action list.
Checking and modifying screen element properties #
Clicking on the screen element in the step opens a UIObject Field window where you can make detailed settings for the screen element.

UIObject Field #
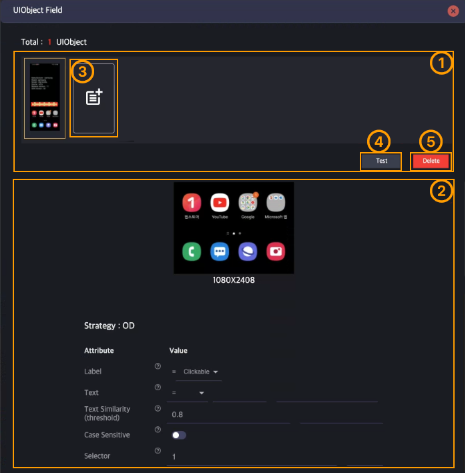
① List of screen elements #
For a step, you can add multiple screen elements through the UIObject Field window. When the test is performed, if any of the screen elements match the current device screen, it will be honored first to perform an action on that element.
For example, if the Youtube icon image may be same but has different app name depending on the device’s language setting (i.e. English/Hangul). In this case, it’s better to register both the English and Korean Youtube icons together.
② Screen Element Properties Panel #
At first, the properties of the first element always get displayed. However, clicking a particular element in the list of screen elements outputs the properties of that element.
Fine tuning property value in this panel allow detail control of test scenarios. The value of the properties of the screen element depends on the screen analysis tool that you used to create the screen element.
See the on-screen analysis tool for a detailed description of each property.
-> List of screen analysis tools
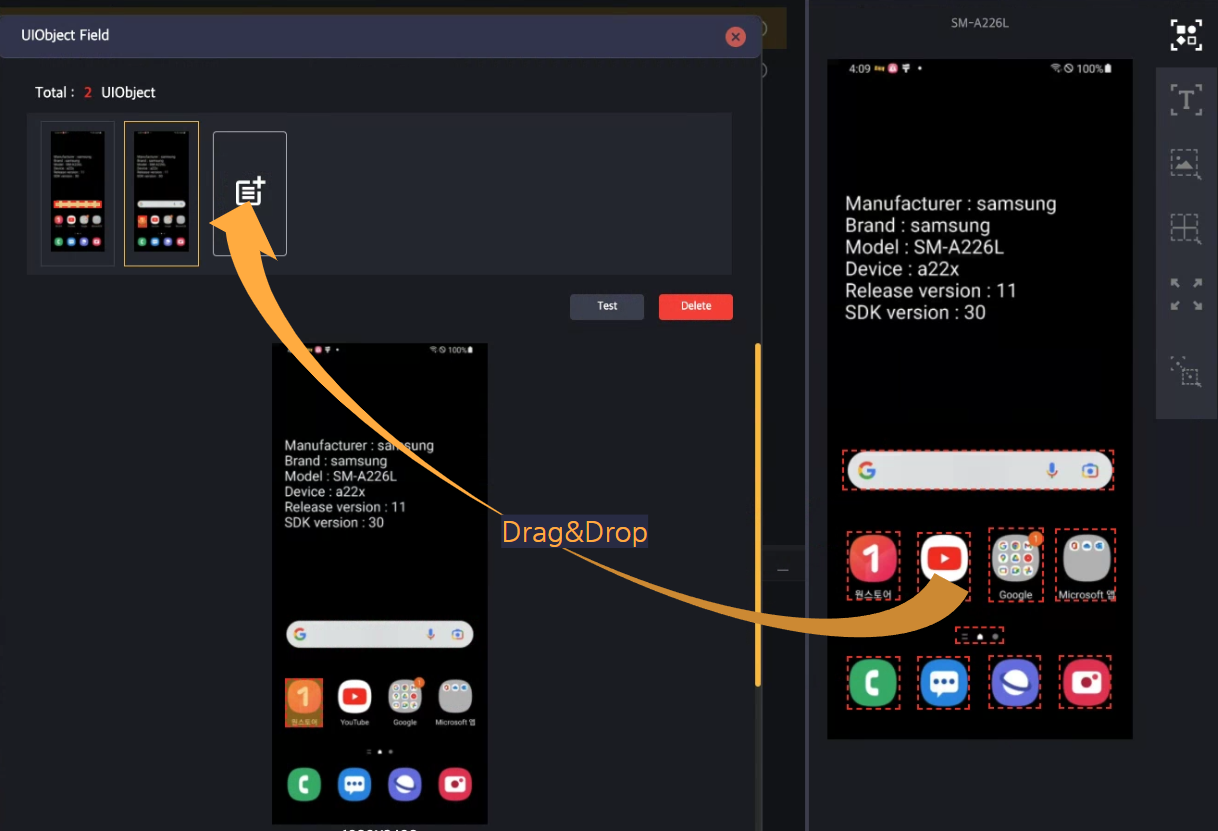
③ Drop Zone for Additional Screen Element #
You can add additional screen element to the step. Select a new screen element in the Screen Analysis panel and drag & drop it into this space to add a new screen element to the current step.
④ Toggle button to switch from editing mode to testing mode #
A button to test with the screen of the device associated with the selected screen element in the screen element list. When pressed, the UIObject Field window changes to test mode.
Click on the “Quit Test Mode” button to exit the test mode.

⑤ Deleting a screen element #
You can delete unnecessary elements from multiple screen elements. However, if there is only one screen element (or last element), you cannot not delete it.