
Screen Analysis Tools #
Stego offers various AI-based screen analysis tools to help you to create a test case scenario quickly and accurately.
Currently, Stego offers a total of 6 powerful screen analysis tools.
Also, Apptest.ai plan to keep adding more powerful AI tools to updated Stego with ongoing research and development.
Start Screen Analysis #

When Stego is connected with a test device, it will immediately mirror the device to start creating the scenario. First, click the button at the top of the menu button to the right of the mirroring screen to switch to the screen analysis panel for the current target device. The screen analysis tool is set to Object Detection (OD) tool by default.


Analyze images imported over the Internet #

Stego is based on visual analysis of a screenshot of the app. Most of the time, Stego can always capture screenshot for this. However, sometimes it’s difficult to take a screenshot when the desired screen can only be obtained with very special condition (i.e. screenshot of the app at 3:15am while you are sleeping) In this case, you can use an image URL alternatively (aka screenshot side-loading) to be analyze without directly taking a device screenshot.
If you already collected error screens a priori to write your test case, it is a far easier to create the test scenario on these side-loaded screenshots than the hard-to- reproduceable error screenshots.
Click the button on the top right side of the UIObject Selector panel to open a pop-up window to enter the image URL.
When you enter the image URL in the pop-up window, you can import the image through the URL, and then continue a screen analysis.

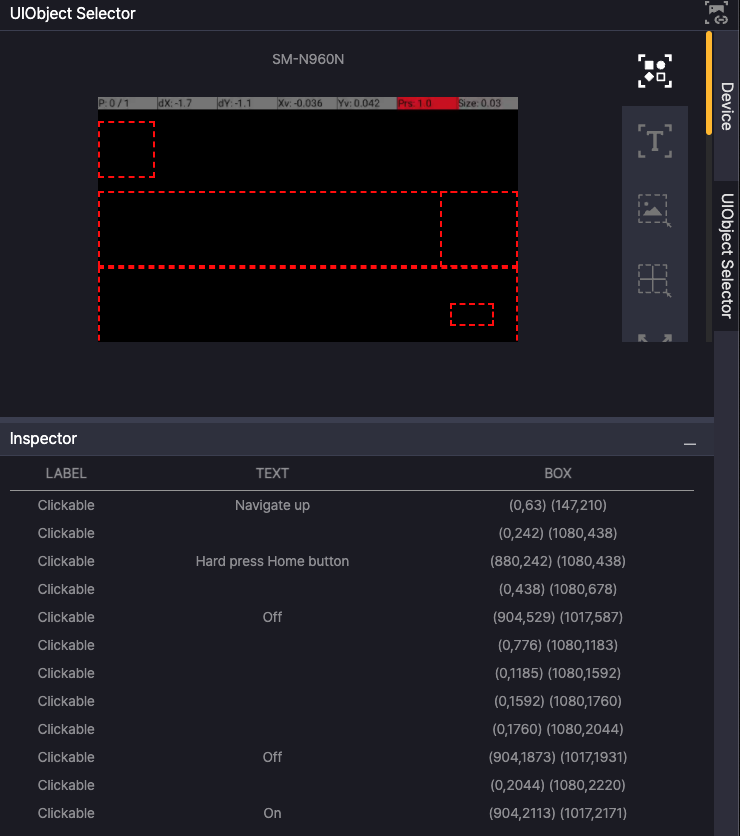
Analyze security screen #
When Android app is built with ‘FLAG_SECURE’, it blocks taking a screenshot and only shows ‘Black Screen’ for the screenshot. In this case, it’s difficult to have Stego visual analysis tool to work properly. However. Stego can circumvent this situation by alternatively using ‘Accessibility’ to obtain an UIElement list.
💡 ‘Accessibility’ based screen analysis is different from Vision based screen analysis. When analyzing the security screen, please make sure that the correct UIElement is selected by checking the Attribute – Text value of the UIElement registered in the “Inspector” window and the scenario step.
- Result of the Vision analysis
- Result of the Accessibility analysis
OD(Object Detection)
#

The default screen analysis tool used for Stego.
The OD is based on powerful AI engine, which was pretrained to recognize icons, components, and screen areas commonly appear in mobile apps. Given a screenshot, powerful OD can analyzes and detects 15 common UI Objects of screen elements.
The types of screen elements pretrained with AI engines are as follows.
- Home Icon
- Back Button
- HamburgerMenu
- Search Icon
- Clickable Object
- AD Icon
- More Icon
- Spinner Icon
- SearchArea
- Swipe Icon
- EditText Area
- Keyboard
- Tabs
- Close Icon
- Switch
- Third party keyboard
- Radio
- CheckBox
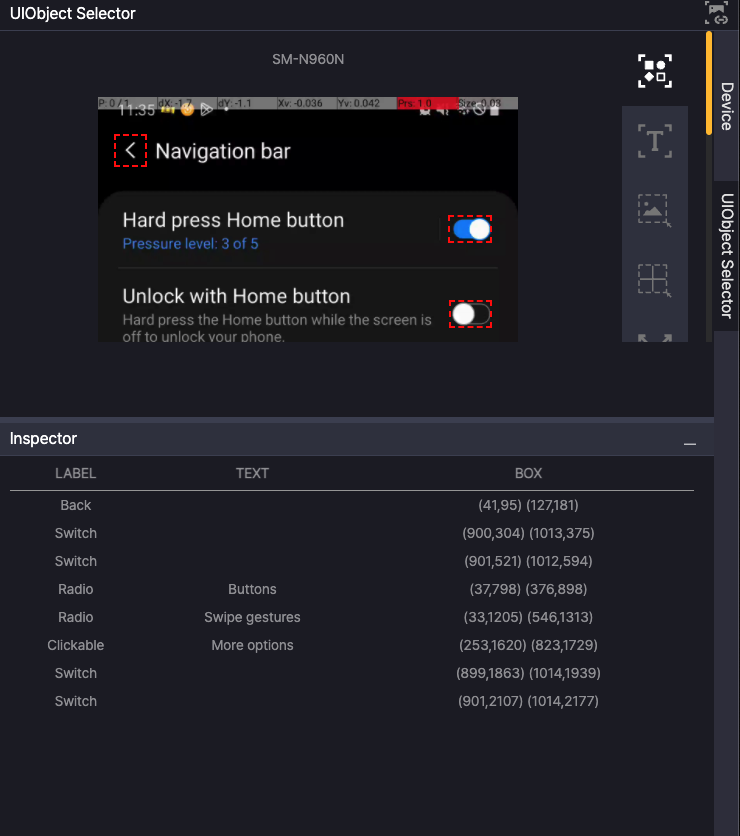
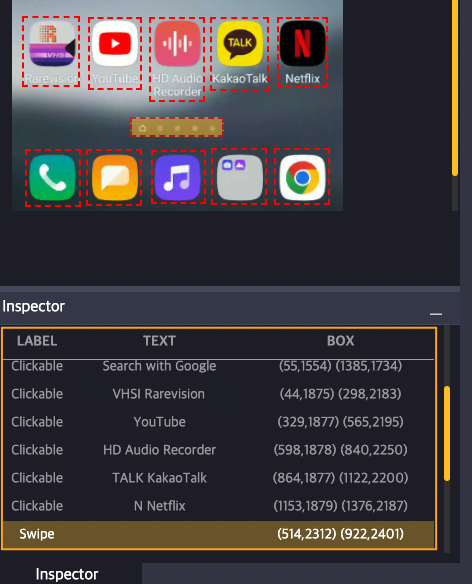
OD Result Inspector #
By clicking “Inspector” at the bottom of the screen analysis panel, you can examine the visual analysis result of our AI based Object Detection in the table.
- LABEL: A detected type of screen element. Most screen elements are mainly marked as “Clickable”, which is a touchable element.
- TEXT: An additional AI-based OCR extracted the string from the text image if the object contains the text.
- BOX: A location or a coordinate for the detected element.
Clicking an item in the Inspector table will high-light, “yellow”, the linked screen element in the screen analysis results, and vice versa.
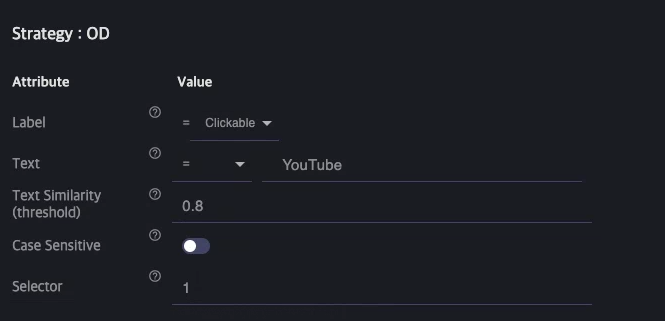
OD Screen Elements Attributes #
You can set various OD properties by clicking on the screen element in the step using OD. Refer to the link below for instructions on how to access the OD screen element attributes.
To check and modify screen element properties
- Text: You can set comparison conditions when testing with character information on screen elements.
= : Check that the text and value of the screen element are the same.
*= : Checks whether the value set to value is included in the text of the screen element.
^= : Check that the value set to value matches the beginning of the text on the screen element.
$= : Check that the value set to value matches the end of the text on the screen element.
match : ‘match’ regular expression comparator will be used. If the text of a screen element starts with one or more characters that match the regular expression, child steps will be executed. To use the entire text of the screen element as a condition, add the $ symbol at the end, such as “/pattern$/”.
search : ’search’ regular expression comparator will be used. If any part of the text on the screen element matches the regular expression, child steps will be executed.
not used: Does not use Text information as a comparison. - Text Similarity(threshold): Indicates string similarity (available only when comparison condition is ‘=’) You can set how identical the character information must be at the time of scenario creation and at the time of test execution to pass through. Due to the nature of OCR, recognition of the same string may result in some misrecognition depending on the resolution and other environments, in which case similarity can be adjusted. The higher the value, the higher the comparison accuracy.
– Default value: 0.8
– Minimum value: 0
– Maximum value: 1 - Case Sensitive: For alphabetic characters, you can set case sensitive for matching.
- Selector: Specifies a selector number when multiple target elements are matched. The number specifies the order of matched element. It can be set to an integer value other than zero.
(Note: If you enter ‘-1’, use the last element.)
OCR ( Optical Character Recognition ) #
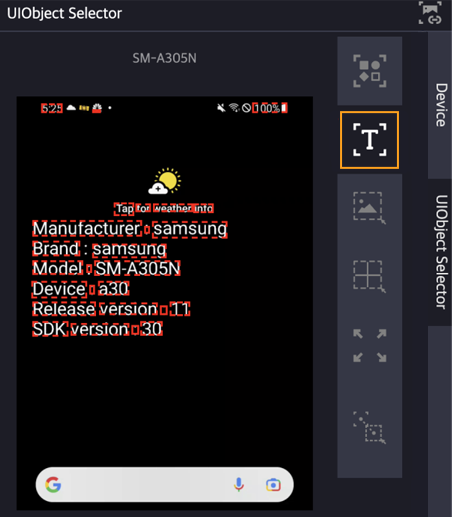
OCR extracts text information on the screen and provides it as a screen element.
Currently, our AI-based OCR can recognize Korean, English, numbers, and special characters.
OCR segments a text string by unit of word by default. If you need to use multiple words as a single screen element (i.e. like a phrase), you can combine them as a single element by selecting multiple words at once while drag & drop.
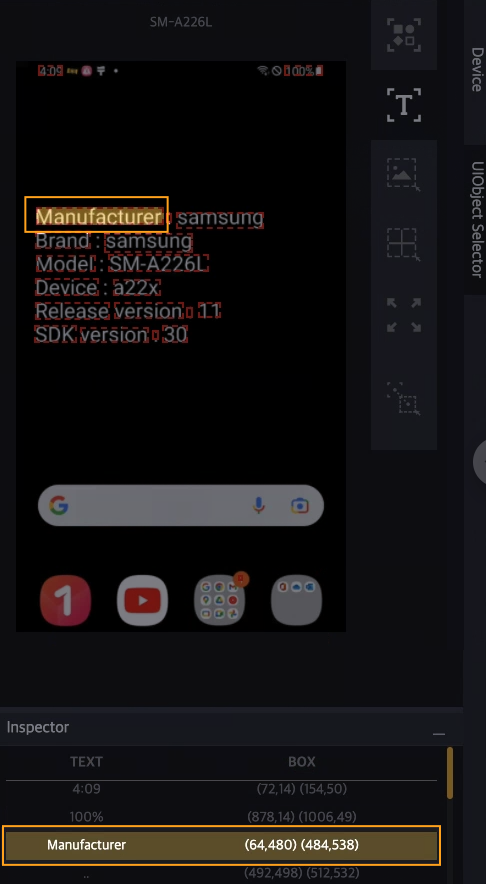
OCR Result Inspector #
Specific information about the words recognized by OCR can be found by clicking “Inspector” at the bottom of the screen analysis panel.
Click “Inspector” to display a list of recognized words in a table format.
- TEXT: A recognized string from the text image if the object contains the text.
- BOX: A location or a coordinate for the detected word element.
Clicking an item in the Inspector table will high-light, “yellow”, the linked screen element in the screen analysis results, and vice versa.
OCR Screen Element Attribute #
You can set various OCR properties by clicking on the screen element in the step using OCR.
See the link below for instructions on how to access the OCR screen element attributes.
Set Step Properties
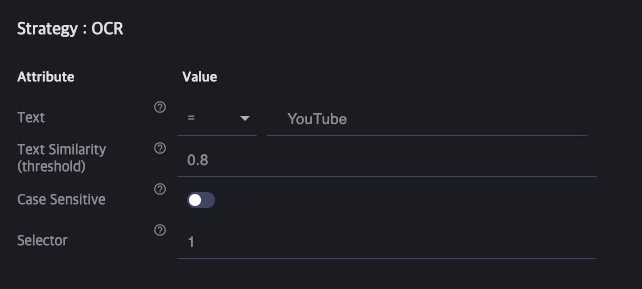
- Text: You can set comparison conditions when testing with character information on screen elements.
= : Check that the text and value of the screen element are the same.
*= : Checks whether the value set to value is included in the text of the screen element.
^= : Check that the value set to value matches the beginning of the text on the screen element.
$= : Check that the value set to value matches the end of the text on the screen element.
match : ‘match’ regular expression comparator will be used. If the text of a screen element starts with one or more characters that match the regular expression, child steps will be executed. To use the entire text of the screen element as a condition, add the $ symbol at the end, such as “/pattern$/”.
search : ’search’ regular expression comparator will be used. If any part of the text on the screen element matches the regular expression, child steps will be executed. - Text Similarity(threshold): Indicates string similarity (available only when comparison condition is ‘=’) You can set how identical the character information must be at the time of scenario creation and at the time of test execution to pass through. Due to the nature of OCR, recognition of the same string may result in some misrecognition depending on the resolution and other environments, in which case similarity can be adjusted. The higher the value, the higher the comparison accuracy.
– Default value: 0.8
– Minimum value: 0
– Maximum value: 1 - Case Sensitive: For alphabetic characters, you can set case sensitive.
- Selector: Specifies which element to use when multiple elements match the screen element during the test. It can be set to an integer value other than zero.
(Note: If you enter ‘-1’, use the last element.)
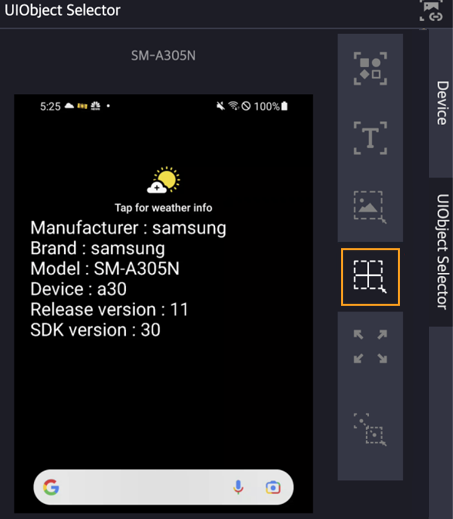
Crop Image #
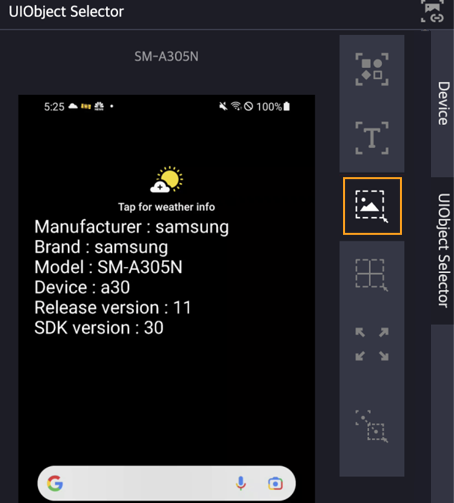
If some reason OD and OCR doesn’t give you the desirable element list of your interest after analyzing the screen, you can use ‘Crop Image’ by directly selecting the screen element by dragging and dropping from the device screen. In this case,cropped image will be used with Feature Matching algorithm.
There are several tips/precautions when creating screen elements with Crop Image.
1. Complex images have a higher recognition rate than simple images. Because the feature points of an image are extracted and used as a comparison object, the more complex images are extracted, the higher the recognition rate is.
2. The recognition rate will increase, if you set ‘no’ to include background when selecting an image. This is because the higher the proportion of monochromatic regions, the lower the feature point ratio.

 Setting the background area to a minimum has a higher recognition rate.
Crop Image Screen Element Attribute #
You can set various properties by clicking on the screen element in a step using Crop Image.
See the link below for instructions on how to access the screen element attributes.
Set Step Properties
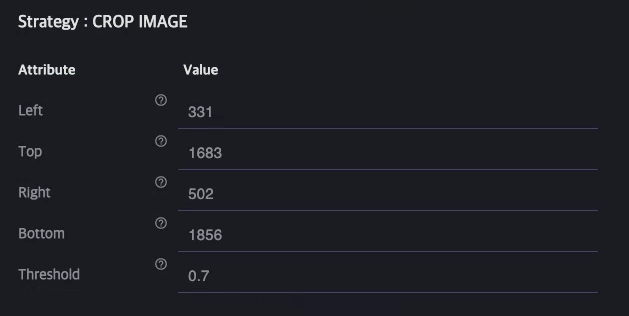
- Left: Top left X coordinates of the screen element
- Top: Top left Y coordinates of the screen element
- Right: Bottom right X coordinates of the screen element
- Bottom: Bottom right Y coordinates of the screen element
- Threshold: Feature Matching Similarity. The higher the number, it will be more selective to match.
– Default: 0.7
– minimum: 0
– maximum: 1
Custom Box #
Screen analysis tool used to make a visual element of specific area of screens. It is mainly used to perform area-based actions rather than specific screen elements such as scrolling and swipe.
Custom Box Screen Element Attribute #
You can set various properties by clicking on the screen element in a step using the Custom Box.
See the link below for instructions on how to access the screen element attributes.
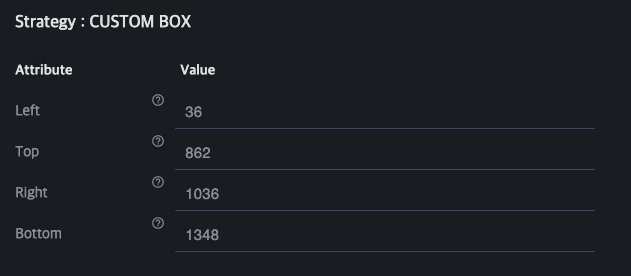
- Left: Top left X coordinates of the screen element
- Top: Top left Y coordinates of the screen element
- Right: Bottom right X coordinates of the screen element
- Bottom: Bottom right Y coordinates of the screen element
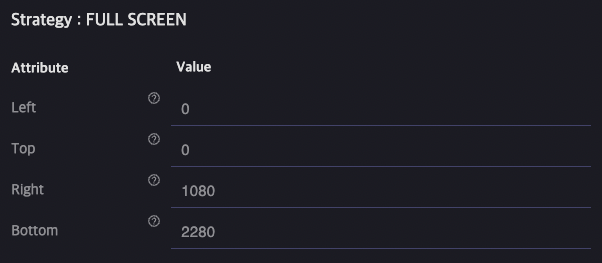
Full Screen #
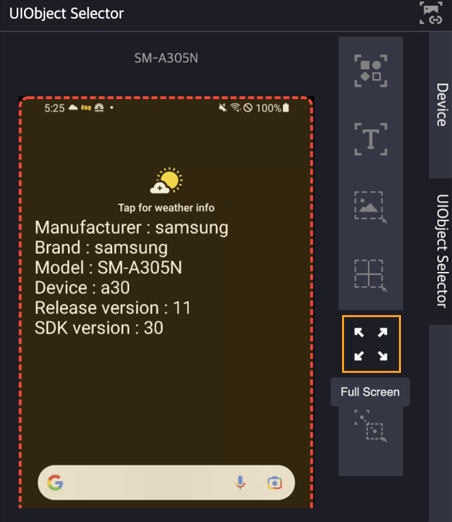
Used to set the entire screen as a screen element. It is mainly used to scroll or swipe through the entire area.
It’s handy special case of Custom Box to select the whole screen.
Full Screen Screen Element Attribute #
Properties cannot be modified for Full Screen.
See the link below for instructions on how to access the screen element attributes.
- Left: Top left X coordinates of the screen element
- Top: Top left Y coordinates of the screen element
- Right: Bottom right X coordinates of the screen element
- Bottom: Bottom right Y coordinates of the screen element
Relative #
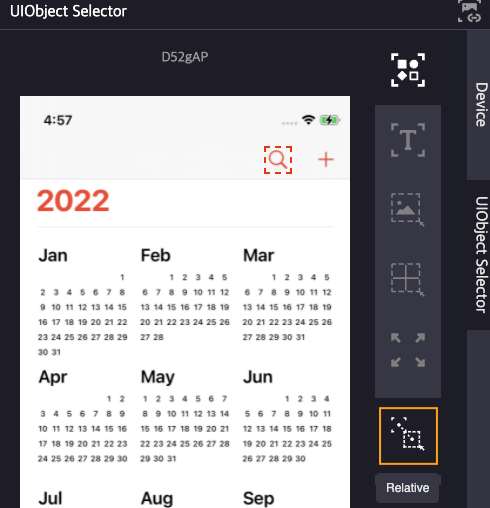
If the screen element to be used in Step is ambiguous to specify the screen element by OD or OCR because the content changes in real time, you need to have some clever matching strategy. In this case, you may use powerful ‘Relative’ matching.
In ‘Relative’, you can define a paired elements, one of which will act as a reference point or ‘anchor’ element and the other will be the volatile target element nearby the ‘anchor’. For the anchor element, you can set very visible or static element, then dynamic content element can be define as a friend element to the anchor.
As for the anchor element, screen elements set using OD, OCR, and Crop Image are used, and the actual screen elements to be used are selected and set by drag & drop.
See the example for detailed instructions.
Example3. Check specific location words
Example5. Using conditional actions
Relative screen element attributes #
You can set various properties by clicking on the screen element in a step using Relative.
See the link below for instructions on how to access the screen element attributes.
Set Step Properties
The Relative screen element provides attributes for both the reference point and the Relative.
Baseline Screen Element Attribute #
See the attributes of the screen analysis tool used to set the reference point.
OD(Object Detection)
OCR(Optical Character Recognition)
Crop Image
Relative Screen Element Attribute #
- Left: Top left X coordinates of the screen element
- Top: Top left Y coordinates of the screen element
- Right: Bottom right X coordinates of the screen element
- Bottom: Bottom right Y coordinates of the screen element