

① Click ‘ + ‘ button to create Step.
② You can change the name of the generated Step by clicking it.
③ When you click the action selection for a Step, a list of possible actions is displayed as shown below.

Motion
These are the actions that are used to actually operate a smartphone.
Variables
These are features to store certain values during a test, or to randomly generate values (numbers, text). The values stored here can be used in other steps.
Control
These are features that you can use when a scenario requires a branch point or when you need to repeat the same steps.
Assertion
These are features that you use to check for elements or strings appearance in a specific location on the screen. If the assertion action used fails to meet the specified condition, the scenario stops with an error message in red.
It is mainly used to verify that the step has progressed well after a particular step is performed (for example, to verify the welcome message after log in).
Events
These are the various control actions that can be performed on the device, not in Motion. For example, you can turn the portrait screen into a landscape screen, launch or shut down the app, and so on.
Advanced
Advanced features are included to create an advanced scenario.
Motion #
It’s a list of actions that are used to actually operate a smartphone.
Touch #
Action to a screen element. This is the most commonly used action when creating a step, and it is also set to the default value of the action when creating a new step.
Touch Attributes
- UIObject: A target screen element to perform the touch action.

NTimes Touch #
Action to touch a screen element as many times.
NTimes Touch Attributes
- UIObject: A target screen element to perform multiple touch actions.
- count: A number of times to perform an action.
– Default value: 2
– Minimum value: 1
– Maximum value: 100 - interval: An interval time between touch actions.
– Minimum: 500
– Maximum: 5000
– Unit: ms

Double Touch #
Action to double touch the screen element.
Double Touch Attributes
- UIObject: A target screen element to perform a double touch.

(Double Touch Action attributes Example)
Long Touch #
Action to touch and hold the screen element.
Long Touch Attributes
- UIObject: A target screen element to perform a long touch.
- duration: An interval time to keep touching.
– Default value: 3000
– Minimum value: 1000
– Maximum value: 5000
– Unit: ms

(Long Touch Action Attributes Example)
Swipe #
Action to swipe left and right against a swipeable UIObject.
Swipe Attributes
- area: A percentage of a target element where swipe will be performed. The smaller the number, the less area you swipe.
– Default value: 60
– Minimum value: 1
– Maximum value: 100
– Unit: % - UIObject: A target screen element to perform the swipe.
- direction: A direction (i.e. left or right) of swipe.
– Default value: LEFT - duration: A swipe duration time.
– Default value: 2500
– Minimum value: 500
– Maximum value: 5000
– Unit: ms
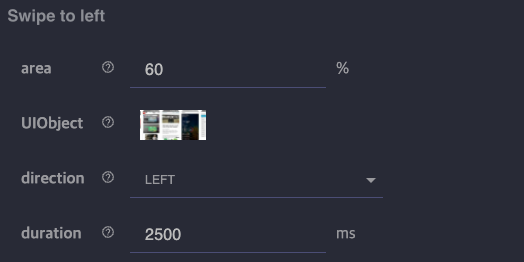
(Swipe Action Attributes Example)
Scroll #
Action to scroll up and down to a screen element. When scrolling through the entire screen, you can use Full Screen Strategy in the UIObject Selector panel to register the screen element in the step.
Caution) On Android devices, if there is a touch element in the bottom area or the Navigation bar is set to Swipe gesture, when using the Full Screen Strategy for screen analysis and Scroll action, even though setting the area to 95% or more may result in the Scroll action being performed normally, there may not be any actual change on the screen.
Scroll Attributes
- area: A percentage of areas of a target element where scroll will be performed.
– Default value: 60
– Minimum value: 1
– Maximum value: 100
– Unit: % - UIObject: A target screen element to scroll.
- direction: A direction (i.e. up or down) of scroll
– Default value: UP - duration: A swipe duration time
– Default value: 2500
– Minimum value: 500
– Maximum value: 5000
– Unit: ms

(Scroll Action Attributes Example)
Drag #
For drag action, you need two target screen elements: dragging is performed from the first screen element to the second screen element.
This action is mainly used on screens that set the date or time.
Drag Attributes
- start UIObject: A screen element that is the basis for initiating the drag action.
- end UIObject: A screen element that serves as the reference for ending the drag action.
- press duration: An interval time to press and hold before starting the drag action.
– Default value: 0
– Minimum value: 0
– Maximum value: 5000
– Unit: ms - drag duration: An interval time it takes for the drag action to take place.
– Default value: 2500
– Minimum value: 500
– Maximum value: 5000
– Unit: ms

(Drag Action Attributes Example)
Pinch In / Pinch Out #
Perform the Zoom in, Zoom out action.
Pinch In / Pinch Out Attributes
- area: A percentage of areas of the target element where Pinch In/Out will be performed.
– Default value: 60
– Minimum value: 50
– Maximum value: 100
– Unit: % - UIObject: A screen element to perform Pinch In/Out.
- duration: An interval time it takes to perform the action.
– Default value: 2500
– Minimum value: 1000
– Maximum value: 5000
– Unit: ms
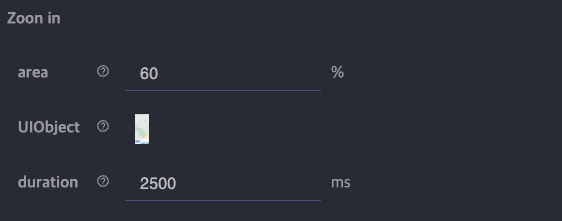
(Pinch-in/out action attributes example)
Input #
Action to enter a specific value from your keyboard. With the keyboard active on the app screen, set the full screen to UIObject and enter the value you want to enter in the Value field in the Attributes panel.

Input Attributes
- value: Sets the string to be entered in the input field.
- UIObject: a screen element to perform the string to be entered. If the keyboard is active on the screen, setting the full screen to UIObject will fill in the currently active input field.

(Input Attributes Example)
Secure Keyboard #
Enter the input value set in Attributes on the security keyboard displayed on the screen.
Caution) Full Screen Strategy should be used with the security keyboard turned on.
Secure Keyboard Attributes
- value: A value to enter on the security keyboard.
- UIObject: A screen element to perform the string to be entered by Secure Keyboard.
- typename: A type of Secure Keyboard. (It is entered automatically.)
- interval: A idle time between keystrokes.
– Default value: 1000
– Minimum value: 500
– Maximum value: 5000
– Unit: ms

(Secure Keyboard Attributes Example)
Variables #
These are features to store certain values during a test, or to randomly generate values. The values stored here can be used in other steps.
Caution) The key value is not case sensitive.
Store Value #
Action to store specific values.
For example, if you need to create a scenario where you need to enter your login ID frequently, you can set the value in advance at the beginning and retrieve it from where you need it.
Store Value Attributes
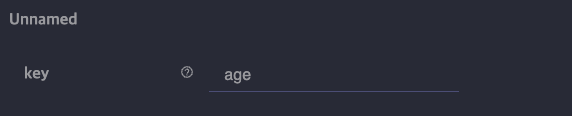
- key: A key name to use when using stored values for other steps.
- value: An actual data stored at the key.

(Store Value Attributes Example)
Store Content #
Action to read and store strings at specific locations on the screen. You can use the key value when you use the value stored here in another step.
Please refer to the following example.
Example3.
Store Content Attributes
- key: An identifier for using values saved in another step.
- UIObject: A target screen element to which the data will be read.
- pattern: A regular expression. If you want to save the value of the element with “welcome” without case-sensitivity, you can enter the ‘/welcome/i’ regular expression.
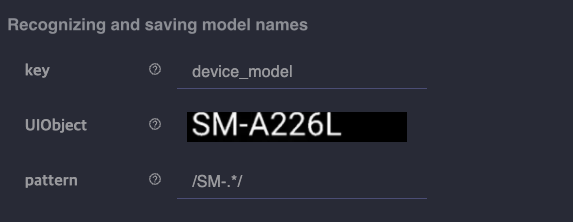
(Store Content Attributes Example)
Random Number #
Action to generate random number.
Random Number Attributes
- key: An identifier for using saved values.
(Random Number Attributes Example)
Random Text #
Action to generate random text.
Characters used for random generation are lowercase letters (a-z), upper case letters (A-Z), and numbers 0-9.
Random Text Attributes
- key: An identifier for random text.
- prefix (optional): A prefix string for the random text
- number of characters: A length of the text in characters to generate randomly. (You can choose from 1-10.)

(Random Text Attributes Example)
Export Variable #
Action to export variable from shared scenario to the scope of the parent scenario.
In order to use the saved value of any variable of ‘Store Value’, ‘Store Content’, ‘Random Number’, and ‘Random Text’ from shared scenario, the variable must be accompanied with Export Variable.
Export Variable Attributes
- key: A key of the stored value to share with other scenarios.

(Example of Export Variable Attributes)
Control #
These features that you can use when a scenario requires a branch point or when you need to repeat the same steps.
If UIObject #
Action to use to determine if the set UIObject exists on the screen and run the child step.

If UIObject Attributes
- UIObject: A target screen element that will be used to verify its appearance on the screen.
- comparator: An operator used for comparison.
– EXISTS: If a screen element exists on the screen, run the child step.
– NOT EXISTS: If the screen element does not exist on the screen, run the child step.

(If UIObject Attributes Example)
If Content #
Action to branch conditionally on the comparison of the content of the target element.
Please note there is difference between ‘If UIObject’ and ‘If Content’. The difference is that If UIObject uses the screen element itself as a comparison, while If Content uses the Text information contained in it as a comparison rather than the screen element itself.

If Content Attributes
- UIObject: A target screen element containing the text to be compared.
- comparator: A conditional operator for comparison.
= : If a text of the screen element and a specified value are same, run the child step.
!= : If a text of the screen element and a specified value are different, run the child step.
> : If a text of the screen element is numeric and greater than value, run the child step.
>= : If a text of the screen element is numeric and is greater than or equal to value, run the child step.
<: If a text of the screen element is numeric and less than value, run the child step.
<= : If a text of the screen element is numeric and less than or equal to value, run the child step.
match : ‘match’ regular expression comparator will be used. If the text of a screen element starts with one or more characters that match the regular expression, child steps will be executed. To use the entire text of the screen element as a condition, add the $ symbol at the end, such as “/pattern$/”.
search : ’search’ regular expression comparator will be used. If any part of the text on the screen element matches the regular expression, child steps will be executed.
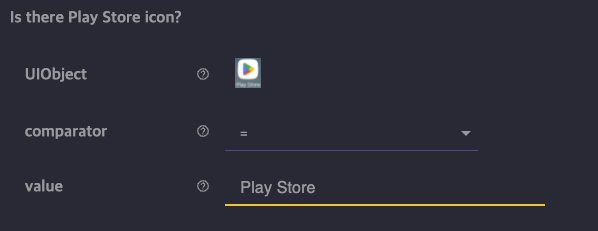
(If Content Attributes Example)
If Value #
Action to use when using a value stored through a Store Value/Content or Random Number/Text action as a comparison destination. Therefore, there is no need to set a separate UIObject.
For more information, please refer to the example below.
Example5.
If Value Attributes
- key: A key value of the previously stored value, such as Store Value/Content.
- comparator: A conditional operator for comparison. Please refer to the comparator section of ‘If Content’.
- value: A string or number to compare.

(If Value Attributes Example)
If Changed #
Action to use to detect a status of visual changes in the screen within a time interval.
By using ‘If Changed’, you can detect visual changes in the content at a specific location on the screen. This is very neat action to detect toast pop-up or playing videos. You can detect this visual abnormality and tie a specific execution or action on this condition. For example, if a movie is playing, you can create a scenario that stops playing the movie using ‘If Changed’.
Please refer to the example below.
Example6.
If Changed Attributes
- UIObject: A space element to detect changes in the screen.
- threshold: A percentage of the screen element difference to decide ‘changed’. The smaller the threshold, the more likely to be determined ‘changed’.
– Default value: 10
– Minimum value: 1
– Maximum value: 100
– Unit: % - limit: An interval time to sample second screen for the change detection. If there is no change in the screen during this time, the child steps are not executed and proceed to the next step.
– Default value: 5000
– Minimum value: 3000
– Maximum value: 10000
– Unit: ms
Loop UIObject #
Action to repeat child steps depending on whether a particular screen element exists on the screen.
The most common use case is when you create a scenario where you need to repeat scrolling until you get the content you want from a listed UI.
Please refer to the example below.
Example2.
Loop UIObject Attributes
- UIObject: A target screen element to be used to determine the existence.
- comparator: A conditional operator for comparison.
– EXISTS: If a screen element exists on the screen, run the child step.
– NOT EXISTS: If the screen element does not exist, repeat the child steps. - limit: A maximum number of iterations for a child step.
– Default value: 5
– Minimum value: 1
– Maximum value: 1000
– Unit: Number of times

(Loop UIObject Attributes Example)
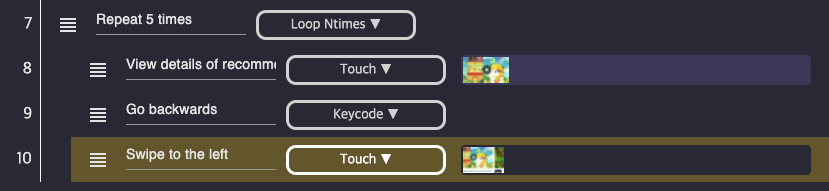
Loop Ntimes #
Action to use when you need to repeat the same step in N times.
This action repeats the child steps a set number of times.
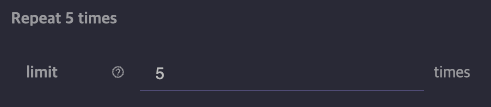
Loop Ntimes Attributes
- 1.limit: A number of iterations.
– Default value: 5
– Minimum value: 1
– Maximum value: 1000
– Unit: Number of times
(Loop Ntimes Attributes Example)
Loop Content #
Action for conditional loop on the basis of the text value for the screen element. Loop Content reads character value at specific locations on the screen to determine if it needs to repeat.
Please check the example below for detailed instructions.
Example7.
Loop Content Attributes
- UIObject: A target screen element to read the text.
- comparator: A conditional operator for comparison. Please refer to the comparator section of ‘If Content’.
- value: A string or number to compare.
- limit: Specifies the number of iterations.
– Default value: 5
– Minimum value: 1
– Maximum value: 1000
– Unit: Number of times

(Loop Content Attributes Example)
Loop Value #
Run the child step by comparing the value you set with the value you saved in Store Value/Content or Random Number/Text. You do not need to specify a separate screen element because it uses a preset value.
Use this action to create a scenario where you can read and save the remaining points on the previous screen and repeat the steps of adding points until the remaining points reach a certain number.
Loop Value Attributes
- key: A key to obtain the preset value.
- comparator: A conditional operator for comparison. Please refer to the comparator section of ‘If Content’.
- value: A string or number to compare.
- limit: Specifies the number of iterations.
– Default value: 5
– Minimum value: 1
– Maximum value: 1000
– Unit: Number of times

(Loop Value Attributes Example)
Loop Wait For #
Action to wait for a specific target screen element to be appear. Some screen may take a longer time to load. In this case, instead of adjusting the default loading time to a bigger value, you can specify a tailored waiting time pertaining to the specific page with ‘Loop Wait for’. By doing this, your overall test run time can be greatly reduced.
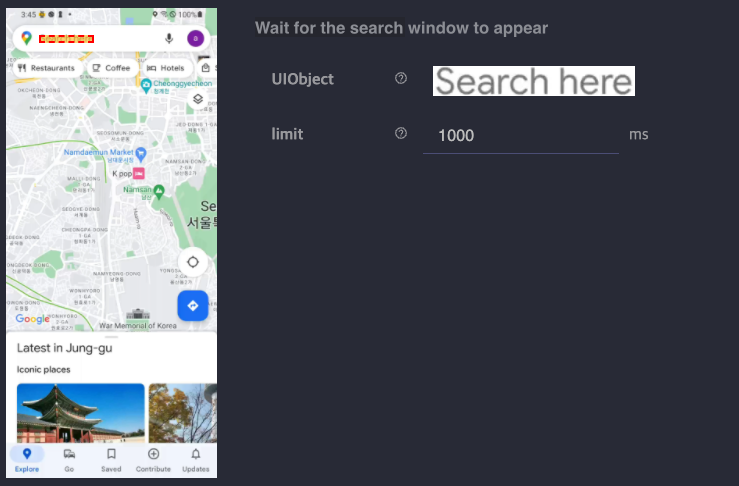
(Example of avoiding whole loading of Google Map by limiting the waiting time for ‘Search Here’ string. This may save test time under slow network or with the low spec devices)
Loop Wait For Attributes
- UIObject: A target screen element that you expect to be appear on the screen.
- limit: A maximal time interval for waiting. If the screen element does not appeared within this time interval, stop waiting and skip to next step.
– Default value: 5000
– Minimum value: 1000
– Maximum value: 60000
– Unit: ms
(Loop Wait For Attributes Example)
Assertion #
These are features that you use to check for elements or strings in a specific location on the screen. If this step action for assertion failed, the scenario stops with an error message in red.
Assertion is the most important and the terminal component of the software testing. It is mainly used to check whether actual execution result is concurred you’re your initial expectation. (for example, to verify the welcome message after log in).
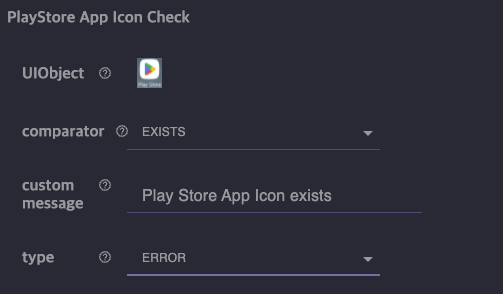
Assert UIObject #
Action to check whether the specified screen element exists on the screen.
With this action, you can verify whether the execution of previous step leads to your expectation “visually”. Please refer to the example below for instructions on how to use it.
Example9.
Assert UIObject Attributes
- UIObject: A target screen element to be inspected.
- comparator: Select the condition compared.
Caution) The conditions set by the comparator must be true before the examination passes and moves on to the next step. If the comparator condition is false, a custom message appears on the screen. If the type is Error, the scenario stops here.
– EXISTS: If a screen element exists on the screen, the scan is successful.
– NOT EXISTS: If no screen element exists on the screen, the scan is successful. - custom message: A message to appear if the comparator condition is false. If left it blank, default custom message will be printed for the failed assertion.
- type: A default behavior for the failed assertion. If the comparator is false, you can choose whether to print the test results as Error or Warning.
– ERROR: If the condition is false, the result is printed in red and the scenario is aborted.
– WARNING: If the condition is false, the result is printed in yellow and the next step continues.
(Assert UIObject Attributes Example)
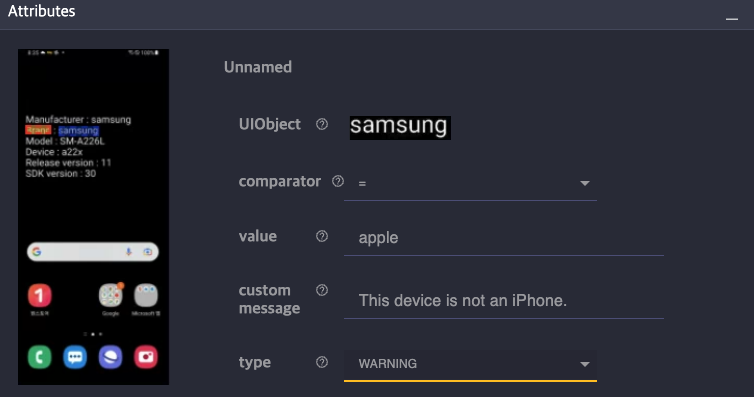
Assert Content #
Action that assert the string content of a specified screen element with the value entered by the author.
Unlike the Assert UIObject, where the presence of the screen element itself is compared, the text within the screen element is compared instead.
Assert Content Attributes
- UIObject: A target screen element to be inspected.
- comparator: A conditional operator for comparison. Please refer to the comparator section of ‘If Content’.
- value: A string or number to compare. Enter ${key} if you want to use a previously set value.
- custom message: A message to appear if the comparator condition is false. If eft it blank, default message will be printed for the failed assertion.
- type: A default behavior for the failed assertion. If the comparator is false, you can choose whether to print the test results as Error or Warning.
– ERROR: If the condition is false, the result is printed in red and the scenario is aborted.
– WARNING: If the condition is false, the result is printed in yellow and the next step continues.
(Assert Content Attributes Example)
Assert Value #
Action to assert the runtime value with Store Value/Content or Random Number/Text.
Because it is an action that checks the value you have set in advance, this action does not require a separate UIObject, unlike Assert Content and Assert UIObject.
Assert Value Attributes
- key: A key for the variable.
Caution) When entering a key, make sure you are using ‘key’ not ${key}. - comparator: A conditional operator for comparison. Please refer to the comparator section of ‘If Content’.
- value: Enter a value to compare with the statement on the screen element. Enter ${key} if you want to use a previously set value.
- custom message: A message to appear if the comparator condition is false. If left it blank, default message will be printed for the failed assertion.
- type: A default behavior for the failed assertion. If the comparator is false, you can choose whether to print the test results as Error or Warning.
– ERROR: If the condition is false, the result is printed in red and the scenario is aborted.
– WARNING: If the condition is false, the result is printed in yellow and the next step continues.
.png?alt=media&token=02e7b4ac-a383-46fc-8bc7-79b5146ce75c)
(Assert Value Attributes Example)
Assert Changed #
Assert Changed is an action to assert a drastic change after some step execution.
This can be used to check whether the content of a particular screen element or location changes after performing an action.
Used primarily to create UI or toggle button change detection scenarios that automatically appear or disappear.
Please refer to the example below for instructions on how to use it.
Example8.
Assert Changed Attributes
- UIObject: A space element to detect changes in the screen.
- threshold: A percentage of the screen element difference to decide ‘changed’. The smaller the threshold, the more likely to be determined ‘changed’
– Default value: 10
– Minimum value: 1
– Maximum value: 100
– Unit: % - limit: An interval time to sample second screen for the change detection. If there is no change in the screen during this time, the child steps are not executed and proceed to the next step.
– Default value: 5000
– Minimum value: 3000
– Maximum value: 10000
– Unit: ms - custom message: A message to appear if the comparator condition is false. If left it blank, default message will be printed for the failed assertion.
- type: A default behavior for the failed assertion. If the comparator is false, you can choose whether to print the test results as Error or Warning.
– ERROR: If the condition is false, the result is printed in red and the scenario is aborted.
– WARNING: If the condition is false, the result is printed in yellow and the next step continues.

(Assert Changed Attributes Example)
Assert Wait For #
Checks whether the specified screen element exists on the screen, similar to the Assert UIObject. However, the difference is that there is the option to choose how long to wait for the screen element to appear.
This can be useful mainly for irregular screen loading times.
Assert Wait For Attributes
- UIObject: A target screen element to be inspected.
- limit: A maximal time interval for waiting for the screen element to appear.
– Default value: 5000
– Minimum value: 1000
– Maximum value: 60000
– Unit: ms - custom message: A message to appear if the comparator condition is false. If left it blank, default message will be printed for the failed assertion.
- type: A default behavior for the failed assertion. If the comparator is false, you can choose whether to print the test results as Error or Warning.
– ERROR: If the condition is false, the result is printed in red and the scenario is aborted.
– WARNING: If the condition is false, the result is printed in yellow and the next step continues.

(Assert Wait For Attributes Example)
Assert Message #
Action to check if toast pop-ups appear well after a particular action.
If an Assert Message detects a change in the screen for a time period set by limit, it reads the characters in the changed part and compares them with the value entered.
Assert Message Attributes
- comparator: Allows you to select a comparison condition.
= : Check that the text and value of the screen element are the same.
*= : Checks whether the value set to value is included in the text of the screen element.
^= : Check that the value set to value matches the beginning of the text on the screen element.
$= : Check that the value set to value matches the end of the text on the screen element.
match : ‘match’ regular expression comparator will be used. If the text of a screen element starts with one or more characters that match the regular expression, child steps will be executed. To use the entire text of the screen element as a condition, add the $ symbol at the end, such as “/pattern$/”.
search : ’search’ regular expression comparator will be used. If any part of the text on the screen element matches the regular expression, child steps will be executed. - value: A string or number to compare. Enter ${key} if you want to use the previously set value.
- limit: You can set how long you want to wait for the screen element to appear.
– Default value: 5000
– Minimum value: 3000
– Maximum value: 10000
– Unit: ms - use previous screen: You can choose whether to detect screen changes from the screen information before the action in the previous step is performed or the screen after the action. If set to true, screen detection starts from the screen before the action in the previous step.
- custom message: A message to appear if the comparator condition is false. If left it blank, default message will be printed for the failed assertion.
- type: If the comparator is false, you can choose whether to print the test results as Error or Warning.
– ERROR: A default behavior for the failed assertion. If the condition is false, the result is printed in red and the scenario is aborted.
– WARNING: If the condition is false, the result is printed in yellow and the next step continues.

(Assert Message Attributes Example)
Events #
These are the various control actions that can be performed on the device, not in Motion. For example, you can turn the portrait screen into a landscape screen, launch or shut down the app, and so on.
Rotate #
Allows you to change the screen orientation of the device (rotate 270 degrees clockwise)
Rotate Attributes
- orientation: Specifies the direction of rotation.
– PORTRAIT: Rotate the device’s screen vertically.
– LANDSCAPE: Rotate the device’s screen horizontally.
Wait #
Wait for the set amount of time to run the next step.
Wait Attributes
- value: Set the wait time.
– Default value: 2000
– Minimum value: 500
– Maximum value: 5000
– Unit: ms
Launch #
Launch the app.
Launch Attributes
- Package Name: If the app you want to run is an Android app, enter the app’s Package Name.
- Bundle ID: If the app you want to run is an iPhone app, enter the Bundle ID of the app.
If you enter both values, the value to be used depends on the type of device on which the test runs.
How to find out Android App Package Name
#
Step1. Go to play.google.com and search for the app.
Step2. The package name on the address bar part the top. ?id=Package Name format.
How to find your iOS App Bundle ID #
Step1. Go to apple.com/kr/app-store and search for the app.
Step2. Check the unique number in the top address bar. /id unique number format.
Step3. Enter the address in the browser in the format below.
https://itunes.apple.com/lookup?id=unique number
Step4. Open the downloaded file in txt format to see the Bundle ID value.
Terminate #
Shut down the running app.
Terminate Attributes
- Package Name: If the app you want to run is an Android app, enter the app’s Package Name.
- Bundle ID: If the app you want to run is an iOS app, enter the Bundle ID of the app.
If you enter both values, the value to be used depends on the type of device on which the test runs.
Activate #
Display the app running in the background on the device screen.
Activate Attributes
- Package Name: If the app you want to run is an Android app, enter the app’s Package Name.
- Bundle ID: If the app you want to run is an iPhone app, enter the Bundle ID of the app.
If you enter both values, the value to be used depends on the type of device on which the test runs.
Home #
Bring up home screen of the device. (Same behavior as pressing the Home button)
Lock #
Change the device to a locked state
Unlock #
Unlock the device.
Wake Up #
Turn off sleep mode when the device is in sleep state.
Keycode #
Action to enter Android specific keycodes.
Caution) The Keycode action is an Android-only action. It doesn’t work on the iPhone and just goes straight to the next step.
Keycode Attributes
- value: A keycode to be entered. You can type a specific keycode or select the default value from the keycode list.
– Back(4): Perform the Android Back button action.
– Enter(66): Perform the Go button action on the keyboard UI.
– Del(67): Performs the backspace action of the keyboard UI.
– AppSwitch(187): Perform the Android App Switch button action.

(Keycode Attributes Example)
Advanced #
Advanced features are included to create an advanced scenario. Currently, there are only shared Scenario features, but a future version will provide new features.
Shared Scenario #
Action to include a shared scenario.
Learn how to create and use shared scenarios through examples.
Example10.
Shared Scenario Attributes
- Shared Scenario: Select the shared scenario to use.

(Shared Scenario Attributes Example)