- Apptest.ai Integration for Jenkins
- Automating Android and iOS app testing with a jenkins pipelinem
Apptest.ai Integration for Jenkins #
Automating Android and iOS app testing with a jenkins pipelinem #
This document explains how to configure Jenkins and use our APIs to automatically run apptest.ai tests from the build phase.
Please refer to the link Jenkins Setup Guide for Jenkins installations
1. Apptest.ai – Integration API #
Test Exectuion API #
- POST https://api.apptest.ai/openapi/v2/testset
- Authorization Basic {user_id}:{access_key}
For details, refer to Rest APIs for CI/CD Page.
Example Response
Callback result data format #
The testing result in the JUnit XML Format is returned using the callback URL.
Check test status #
- GET https://api.apptest.ai/openapi/v2/testset/{testset_id}
- Authorization Basic {user_id}:{access_key}
Get test result #
- GET https://api.apptest.ai/openapi/v2/testset/{testset_id}/result
- Authorization Basic {user_id}:{access_key}
Get scenario ID list #
- GET https://api.apptest.ai/openapi/v2/project/{project_id}/scenarios
- Authorization Basic {user_id}:{access_key}
2. Apptest.ai – Preperation #
2.1 Access Key and Project ID #
To integrate apptest.ai into a Jenkins pipline, an access key and a project ID are required.
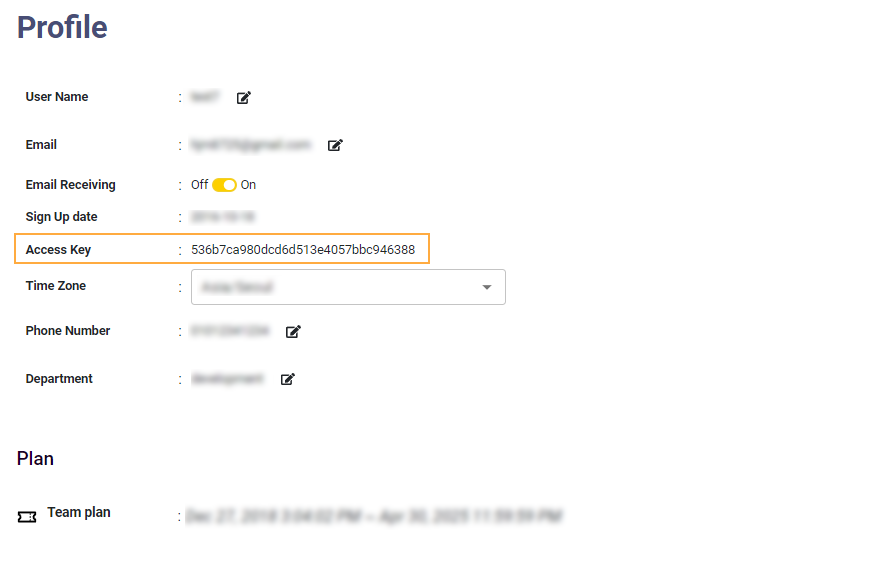
- How to find the access key: An access key is automatically issued when you sign up with apptest.ai. You can locate it in the apptest.ai profile page.
- How to find the project ID: A project ID is assigned when you create a testing project
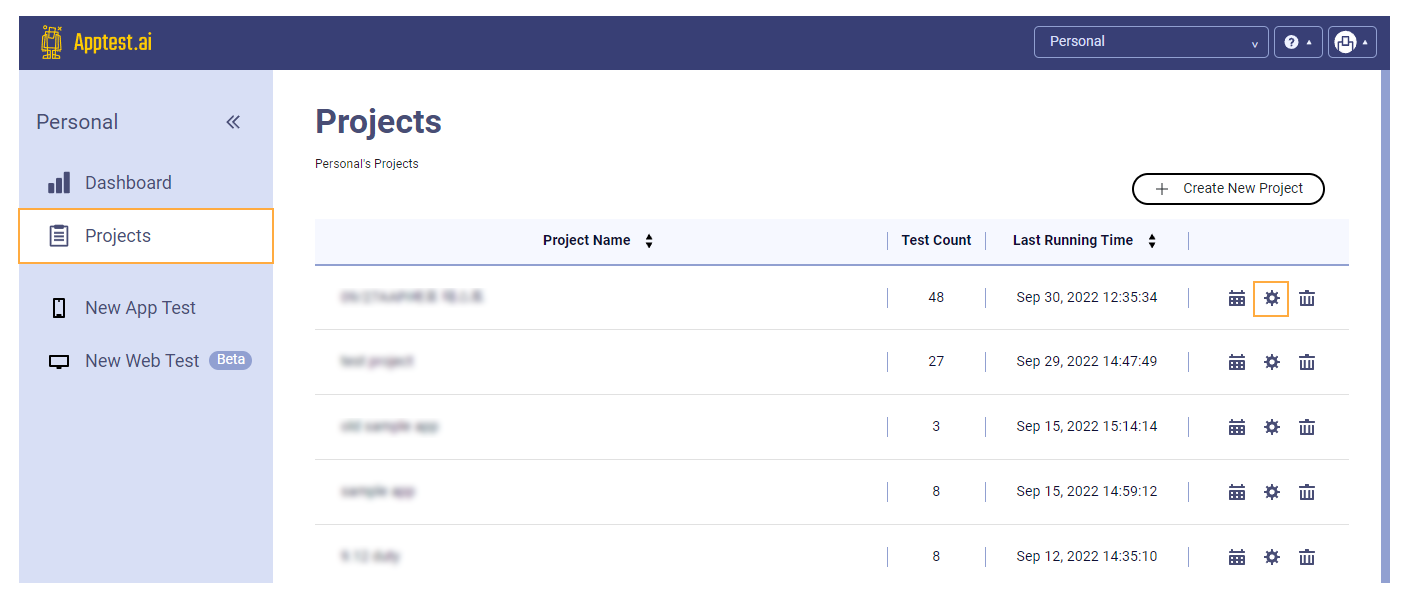
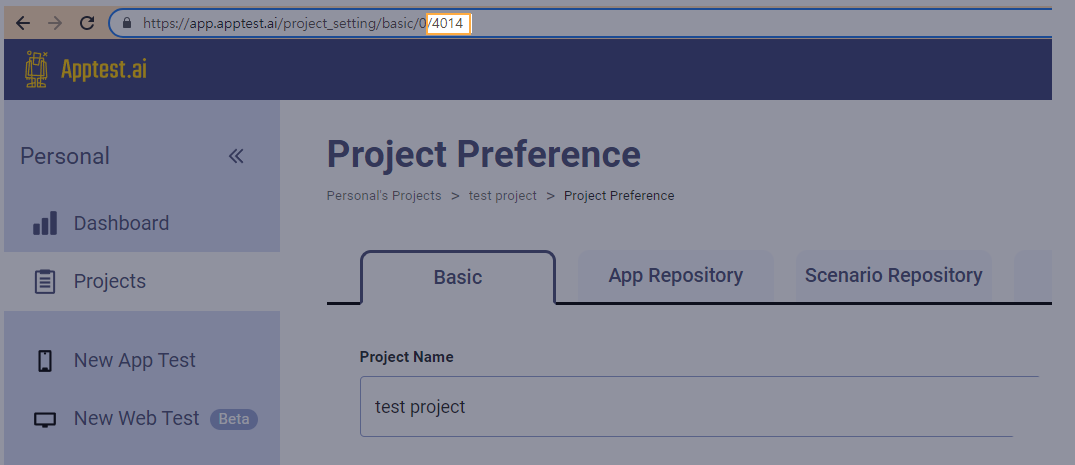
By default, a Sample Test Project Page is created automatically once you sign in.
Changing the preference in the Sample Test Project is not supported. However, you can change the preference for your new projects.
2.2 App Repository and Scenario #
The scenario test can only use scenarios created on Stego from the apptest.ai.
In addition, to configure a scenario test CI for an integration with Jenkins, the mobile app and scenario must be registered in the apptest.ai.
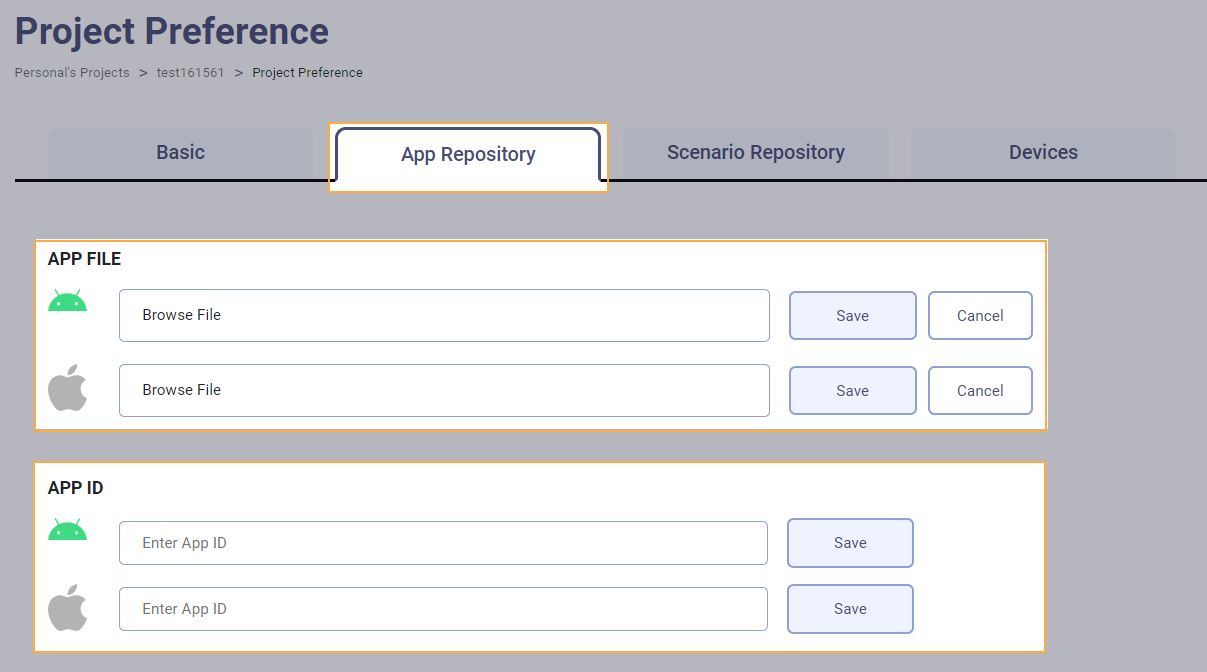
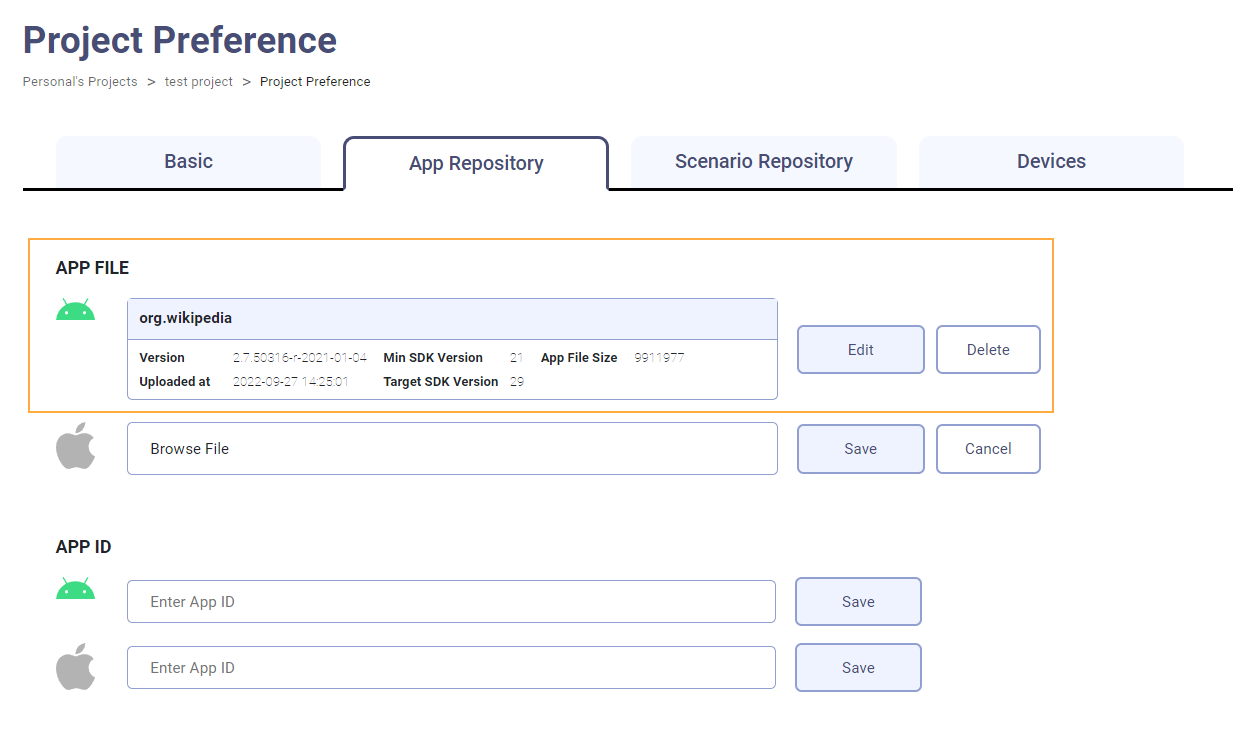
- How to register a mobile app
Mobile app registration is available on the Project Preference page of the apptest.ai. You can register a file or App ID (Package name, Bundle ID).

- How to register a scenario
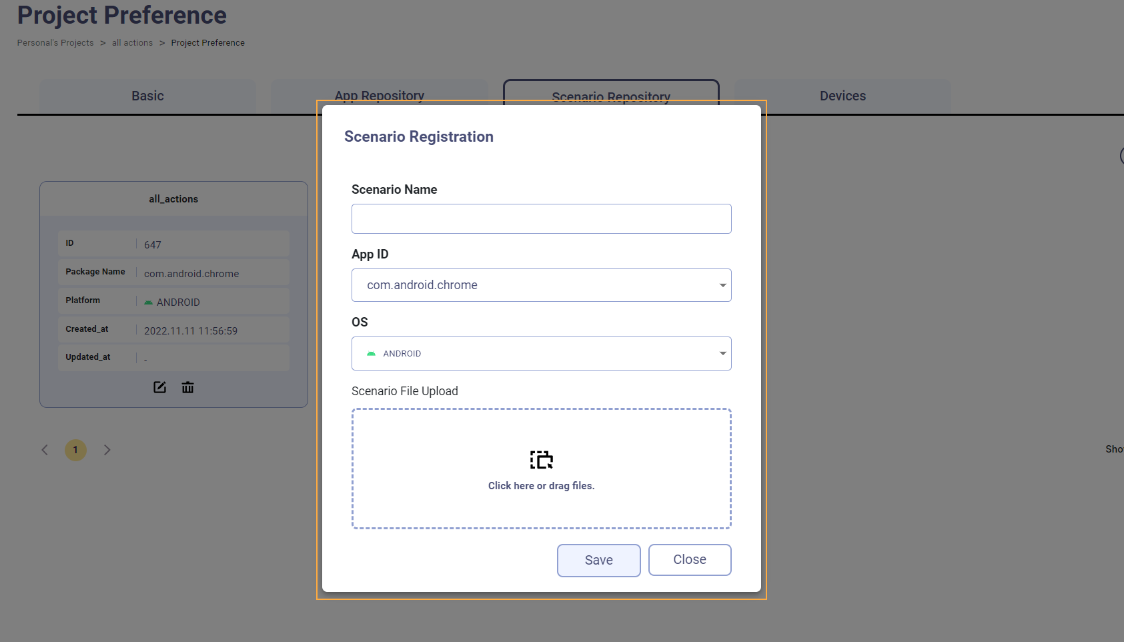
Scenario registration is available on the Project Preference page of the apptest.ai.
To register a scenario, you must first register the app to an App Repository on the Project Setting.
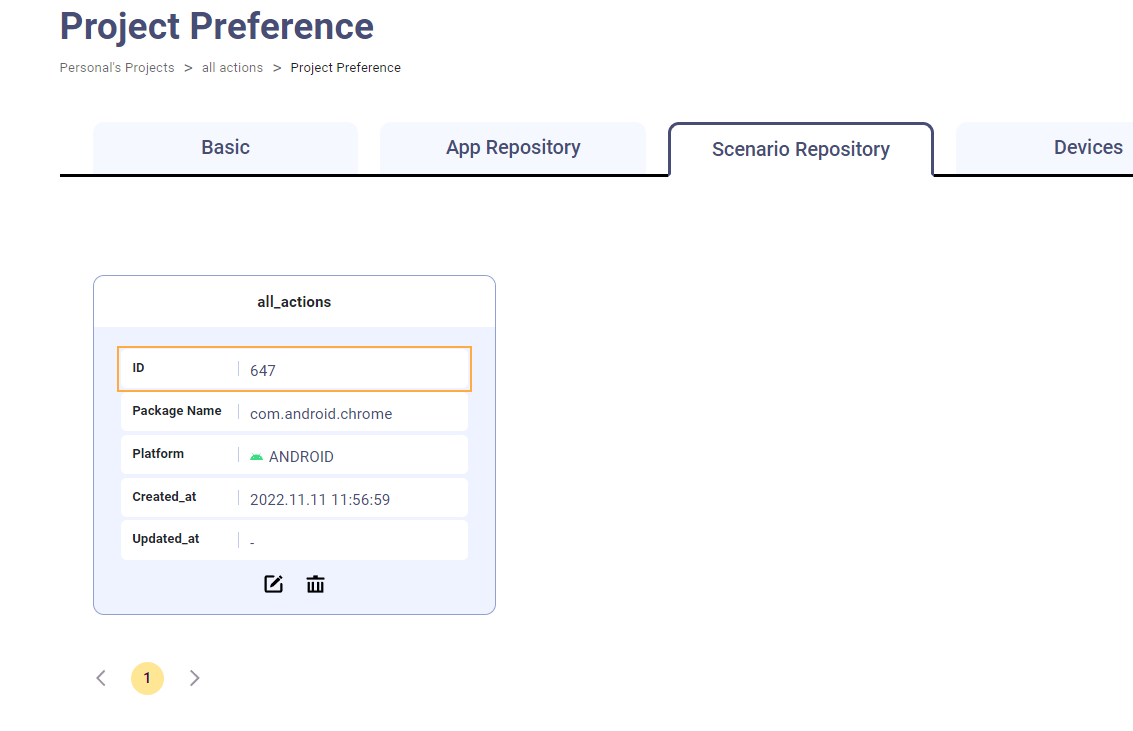
You can test the scenario using the ID of the registered scenario.
3. Jenkins – Webhook Step Plugin Installation #
Search and install the “Webhook step” Plugin in the Jenkins dashboard: [Manage Jenkins] -> [Manage Plugins] -> [Available]
Skip this step if you are using the apptest.ai Test Stage Code2 source code that uses polling instead of webhook in the next stage.
4. Jenkins – Pipeline configuration #
This section demonstrates how to connect an apptest.ai Test stage to a Jenkins pipeline item. A Jenkins pipeline item must be already created.
Please refer to the Example Link for more detail.
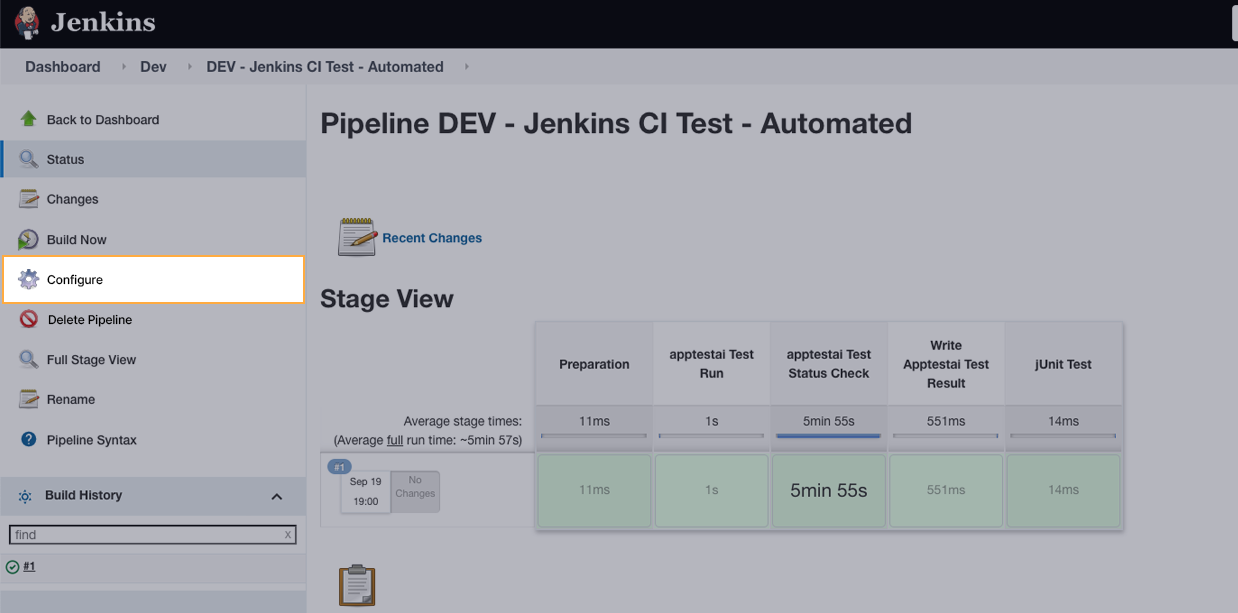
- Go to the setup page and click on the Configure page.
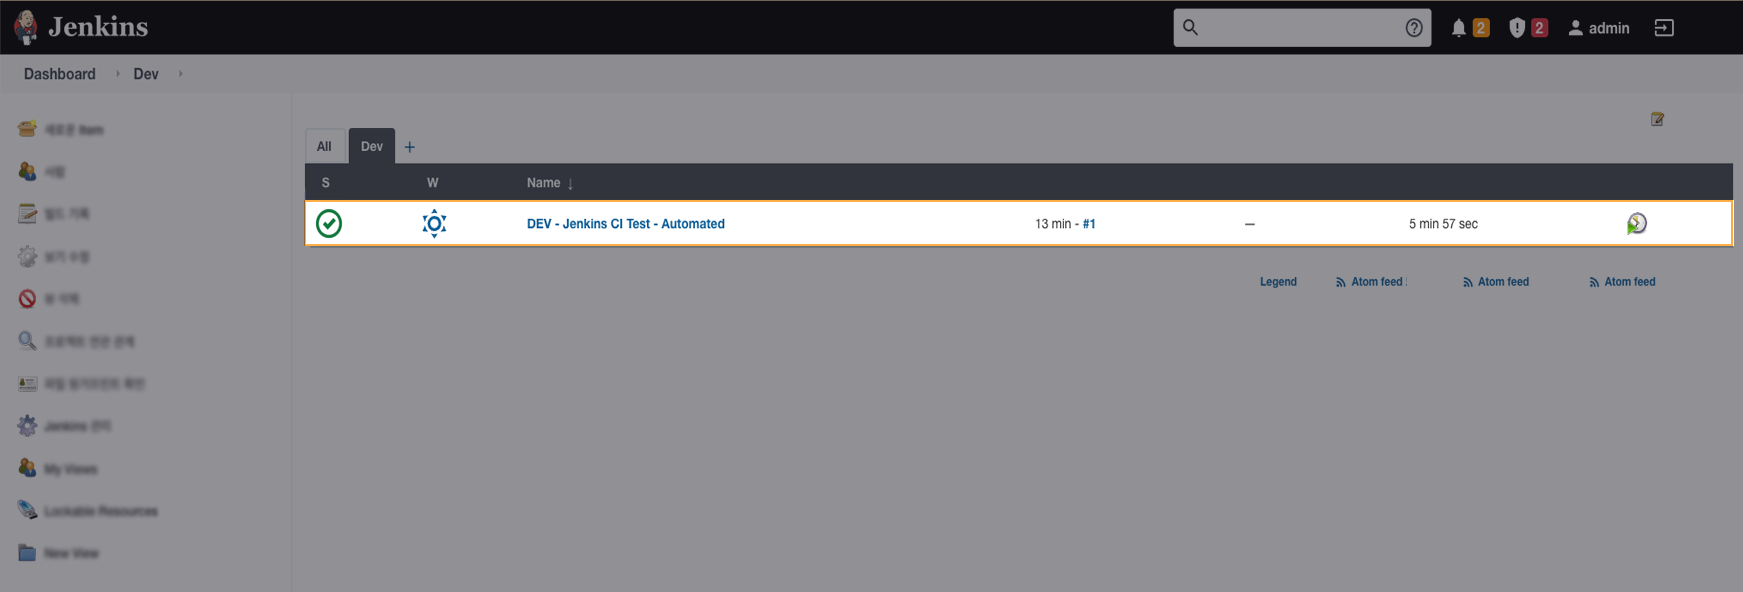
- On the pipeline definition page, add the apptest.ai Test Stage Code to the Script box
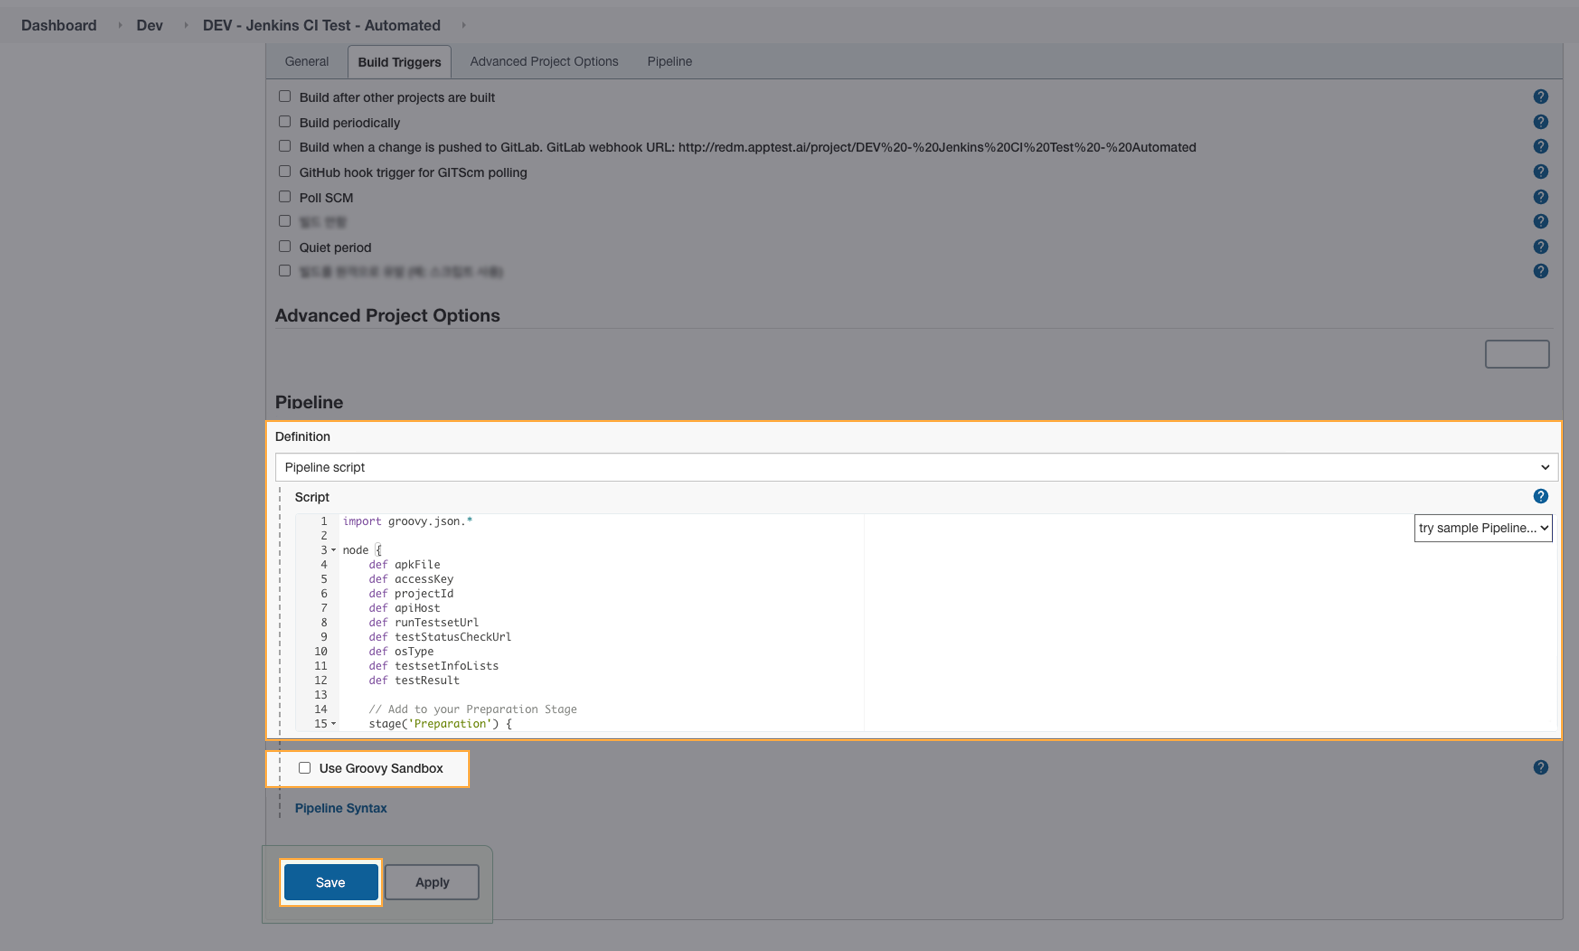
[apptest.ai Test Stage Code 1] – Automated Test with Polling #
import groovy.json.*

node {
    def apkFile
    def accessKey
    def projectId
    def apiHost
    def runTestsetUrl
    def testStatusCheckUrl
    def osType
    def testsetInfoLists
    def testResult

    // Add to your Preparation Stage
    stage(\'Preparation\') {
        echo \"[ apptest.ai ] Current workspace : ${workspace}\"
        userID = \'ci_test@apptest.ai\' // [ Modify ] Your apptest.ai\'s account ( Login ID )
        accessKey = \'xxxxxxxxxxxxxxxxxxxxxxxxxxxxx\' // [ Modify ] Your apptest.ai account\'s accesskey (Check out your profile page)
        projectId = 1234 // [ Modify ] The apptest.ai\'s project ID where the test will be run
        apiHost = \"https://api.apptest.ai\"
 runTestsetUrl = \"${apiHost}/openapi/v2/testset\"
        osType=\'ANDROID\' // [ Modify ] Please enter the os type of the test target. (ANDROID | iOS)

        echo \"[ apptest.ai ] Preparation successfully.\"
    }

    // Apptest.ai Test run Stage
    stage(\'apptestai Test Run\') {
        apkFile=\"/var/jenkins_home/BBC_News_v5.5.1.2.com.apk\"
        // Call apptest.ai\'s Test run API.
        runTestset = sh(returnStdout: true, script: \"curl -X POST -u \'${userID}:${accessKey}\' -F \'app_file=@\\\"${apkFile}\\\"\' -F \'data={\\\"pid\\\": ${projectId}, \\\"testset_name\\\": \\\"${env.BUILD_TAG}\\\",\\\"os_type\\\": \\\"${osType}\\\", \\\"ci_type\\\": \\\"jenkins\\\"}\' ${runTestsetUrl}\").toString().trim()
        runTestsetResponse = new JsonSlurperClassic().parseText(runTestset)
        // Test run fail case
        if (runTestsetResponse.result_code != 0) {
            echo \"[ apptest.ai ] Failed to run the test. ${runTestset}\"
            runTestset = null
            runTestsetResponse = null
            error \"FAIL\"
        }

        testsetId = runTestsetResponse[\'data\'][\'testset_id\']
        runTestset = null
        runTestsetResponse = null

        echo \"[ apptest.ai ] Test run successfully. (Testset ID : ${testsetId})\"
    }

    // Apptest.ai Test status check Stage
    stage(\'apptestai Test Status Check\') {
        completeAll = false
        testResultXml = \'\'

        // Repeat until all tests are complete
        while(!completeAll) {
            // Check the test status for each item in the testsetId lists
            sleep (time: 10, unit: \"SECONDS\")
            testStatusCheckUrl=\"${apiHost}/openapi/v2/testset/${testsetId}\"
            getTestStatusCheck = sh( returnStdout: true, script: \"curl -X GET -u \'${userID}:${accessKey}\' ${testStatusCheckUrl}\").toString().trim()
            getTestStatusCheckResponse = new JsonSlurperClassic().parseText(getTestStatusCheck)
            // Test status check fail case
            if (getTestStatusCheckResponse.result_code != 0) {
                echo \"[ apptest.ai ] Failed to get test status. ${getTestStatusCheck}\"
                getTestStatusCheck = null
                getTestStatusCheckResponse = null
                error \"FAIL\"
            }

            testStatus = getTestStatusCheckResponse.data.testset_status.toLowerCase()
            echo \"[ apptest.ai ] testset ${testsetId} complete result : ${testStatus}\"

            // Get the result data when the test is complete
            if (testStatus == \'complete\') {
                testResultUrl = \"${apiHost}/openapi/v2/testset/${testsetId}/result\"
                getTestResult = sh( returnStdout: true, script: \"curl -X GET -u \'${userID}:${accessKey}\' \'${testResultUrl}\'\").toString().trim()
                getTestResultResponse = new JsonSlurperClassic().parseText(getTestResult)
                // Test result data get fail case
                if (getTestResultResponse.result_code != 0) {
                    echo \"[ apptest.ai ] Failed to get test result data. ${getTestResult}\"
                    getTestResult = null
                    getTestResultResponse = null
                    error \"FAIL\"
                }

                // Merge test result xml data
                testResultXml = getTestResultResponse.data.result_xml
                echo \"[ apptest.ai ] Test completed. tsid : ${testsetId}\"
                getTestResult = null
                getTestResultResponse = null
                completeAll = true
            }
            getTestStatusCheck = null
            getTestStatusCheckResponse = null
        }
        echo \"[ apptest.ai ] All tests are completed.\"
        echo \"[ apptest.ai ] Test result data : ${testResultXml}\"
    }

    // Write apptest.ai test result data to file Stage
    stage(\'Write Apptestai Test Result\') {
        sh \"mkdir -p tmp/\"
        // Write File file:\"tmp/TESTS-Apptestai.xml\", text: testResultXml, encoding: \"UTF-8\"
        sh \"echo -n \'${testResultXml}\' > tmp/TESTS-Apptestai.xml\"
    }

    // JUnit Test Stage
    stage(\'jUnit Test\') {
        junit \'tmp/TESTS-*.xml\'
    }
}
[apptest.ai Test Stage Code 2] – Multi Scenario Test with Polling
#
You must have a scenario ID, source type, and os type to run a scenario test.
import groovy.json.*

node {
    def apkFile
    def accessKey
    def projectId
    def apiHost
    def getScenarioListUrl
    def runTestsetUrl
    def testStatusCheckUrl
    def scenarioQueryString
    def osType
    def scenarioIdLists
    def testsetInfoLists
    def testResult

    // Add to your Preparation Stage
    stage(\'Preparation\') {
        echo \"[ apptest.ai ] Current workspace : ${workspace}\"
        userID = \'ci_test@apptest.ai\' // [ Modify ] Your apptest.ai\'s account ( Login ID )
        accessKey = \'xxxxxxxxxxxxxxxxxxxxxxxxxxxxx\' // [ Modify ] Your apptest.ai account\'s accesskey (Check out your profile page)
        projectId = 1234 // [ Modify ] The apptest.ai\'s project ID where the test will be run
        apiHost = \"https://api.apptest.ai\"
        getScenarioListUrl = \"${apiHost}/openapi/v2/project/${projectId}/scenarios\"
        runTestsetUrl = \"${apiHost}/openapi/v2/testset\"
        scenarioQueryString = \'\' // [ Modify ] When getting a list of scenarios, enter the characters you want included in the scenario name.
        osType=\'ANDROID\' // [ Modify ] Please enter the os type of the test target. (ANDROID | iOS)

        // Get scenario list from project (filter : OS Type , Query String )
        getScenarioList = sh(returnStdout: true, script: \"curl -X GET -u \'${userID}:${accessKey}\' \'${getScenarioListUrl}?os_type=${osType}&q=${scenarioQueryString}\'\").toString().trim()
        getScenarioListResponse = new JsonSlurperClassic().parseText(getScenarioList)
        echo \"[ apptest.ai ] getScenarioListResponse : ${getScenarioListResponse}\"
        if (getScenarioListResponse.result_code != 0) {
            echo \"[ apptest.ai ] Failed to get list of scenarios. ${getScenarioList}\"
            getScenarioList = null
            getScenarioListResponse = null
            error \"FAIL\"
        }
        scenarioIdLists = getScenarioListResponse.data.scenarios
        getScenarioList = null
        getScenarioListResponse = null

        echo \"[ apptest.ai ] Preparation successfully.\"
    }

    // Apptest.ai Test run Stage
    stage(\'apptestai Test Run\') {
        testsetInfoLists = []
        scenarioIdLists.each{
            scenarioId ->
            // Call apptest.ai\'s Test run API.
            runTestset = sh(returnStdout: true, script: \"curl -X POST -u \'${userID}:${accessKey}\' -F \'data={\\\"pid\\\": ${projectId}, \\\"testset_name\\\": \\\"${env.BUILD_TAG}\\\", \\\"scenario_id\\\": ${scenarioId}, \\\"source_type\\\": \\\"file\\\", \\\"os_type\\\": \\\"${osType}\\\", \\\"ci_type\\\": \\\"jenkins\\\"}\' ${runTestsetUrl}\").toString().trim()
            runTestsetResponse = new JsonSlurperClassic().parseText(runTestset)
            // Test run fail case
            if (runTestsetResponse.result_code != 0) {
                echo \"[ apptest.ai ] Failed to run the test. ${runTestset}\"
                runTestset = null
                runTestsetResponse = null
                error \"FAIL\"
            }

            testsetId = runTestsetResponse[\'data\'][\'testset_id\']
            echo \"[ apptest.ai ] TestSet id : ${testsetId} is ran successfully\"
            testsetInfo = [:]
            testsetInfo[\'testset_id\'] = testsetId
            testsetInfo[\'complete\'] = false
            testsetInfoLists << testsetInfo
            runTestset = null
            runTestsetResponse = null
        }

        echo \"[ apptest.ai ] Test run successfully.\"
    }

    // Apptest.ai Test status check Stage
    stage(\'apptestai Test Status Check\') {
        completeAll = false
        testResultXml = \'\'

        // Repeat until all tests are complete
        while(!completeAll) {
            // Check the test status for each item in the testsetId lists
            for (int i = 0; i < testsetInfoLists.size(); i++) {
                waitUntil{
                    sleep (time: 10, unit: \"SECONDS\")
                    item = testsetInfoLists[i]
                    testsetId = item.testset_id
                    if (item.complete == false) {
                        testStatusCheckUrl=\"${apiHost}/openapi/v2/testset/${testsetId}\"
                        getTestStatusCheck = sh( returnStdout: true, script: \"curl -X GET -u \'${userID}:${accessKey}\' ${testStatusCheckUrl}\").toString().trim()
                        getTestStatusCheckResponse = new JsonSlurperClassic().parseText(getTestStatusCheck)
                        // Test status check fail case
                        if (getTestStatusCheckResponse.result_code != 0) {
                            echo \"[ apptest.ai ] Failed to get test status. ${getTestStatusCheck}\"
                            getTestStatusCheck = null
                            getTestStatusCheckResponse = null
                            error \"FAIL\"
                        }

                        testStatus = getTestStatusCheckResponse.data.testset_status.toLowerCase()
                        echo \"[ apptest.ai ] testset ${testsetId} complete result : ${testStatus}\"

                        // Get the result data when the test is complete
                        if (testStatus == \'complete\') {
                            testResultUrl = \"${apiHost}/openapi/v2/testset/${testsetId}/result\"
                            getTestResult = sh( returnStdout: true, script: \"curl -X GET -u \'${userID}:${accessKey}\' \'${testResultUrl}?data_type=bare_xml\'\").toString().trim()
                            getTestResultResponse = new JsonSlurperClassic().parseText(getTestResult)
                            // Test result data get fail case
                            if (getTestResultResponse.result_code != 0) {
                                echo \"[ apptest.ai ] Failed to get test result data. ${getTestResult}\"
                                getTestResult = null
                                getTestResultResponse = null
                                error \"FAIL\"
                            }

                            // Test result xml data init value setting
                            if (testResultXml.length() == 0) {
                                testResultJson = new JsonSlurperClassic().parseText(getTestResultResponse.data.result_json)
                                testResultXml = \"\"
                            }
                            // Merge test result xml data
                            testResultXml = testResultXml + getTestResultResponse.data.result_bare_xml
                            echo \"[ apptest.ai ] Test completed. tsid : ${testsetId}\"
                            getTestResult = null
                            getTestResultResponse = null
                            item[\'complete\'] = true
                        }
                        getTestStatusCheck = null
                        getTestStatusCheckResponse = null
                    }

                    return true
                }
            }
            // Check running test item
            runningTestItem = testsetInfoLists.findAll { element -> element.complete == false }
            // Marking all tests complete when running test count is zero
            if ( runningTestItem.size() == 0 ) {
                testResultXml = testResultXml + \"\"
                completeAll = true
            }
        }
        echo \"[ apptest.ai ] All tests are completed.\"
        echo \"[ apptest.ai ] Test result data : ${testResultXml}\"
    }

    // Write apptest.ai test result data to file Stage
    stage(\'Write Apptestai Test Result\') {
        sh \"mkdir -p tmp/\"
        // Write File file:\"tmp/TESTS-Apptestai.xml\", text: testResultXml, encoding: \"UTF-8\"
        sh \"echo -n \'${testResultXml}\' > tmp/TESTS-Apptestai.xml\"
    }

    // JUnit Test Stage
    stage(\'jUnit Test\') {
        junit \'tmp/TESTS-*.xml\'
    }
}
You can change the following items in the above script.
- userID : apptest.ai\’s Login ID
- accessKey : The access key from apptest.ai
- projectId : The project ID created in apptest.ai
- Testing is performed with preset devices within a time limit defined in the apptest.ai project configuration.
- Changing the preference for the Sample Test Project is not allowed, but you can change the preference in a new project.
- osType : OS type for test target
- apkFile : The app path (App Binary File) to be tested
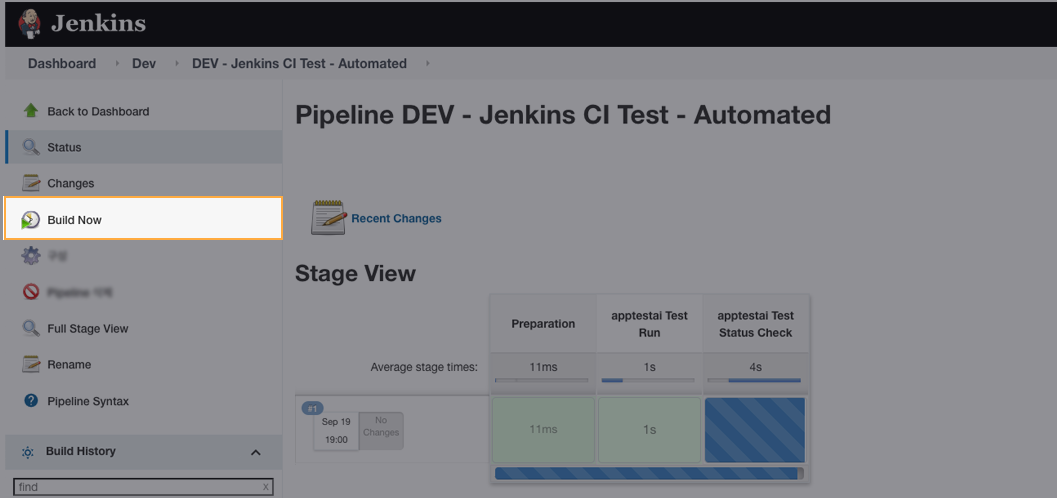
Click “Build Now” in Jenkins to start the pipeline.
5. Test Results #
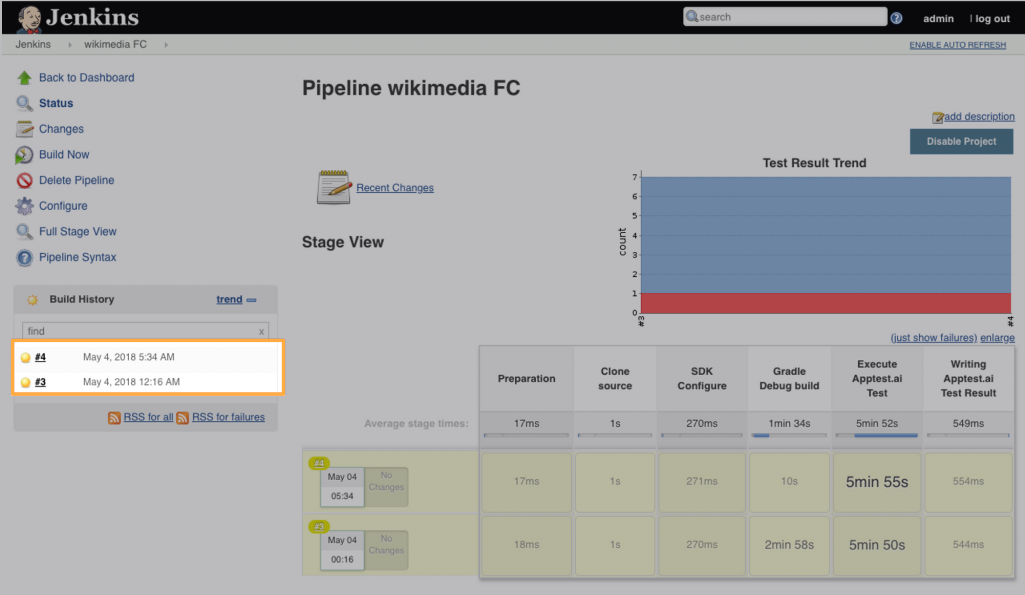
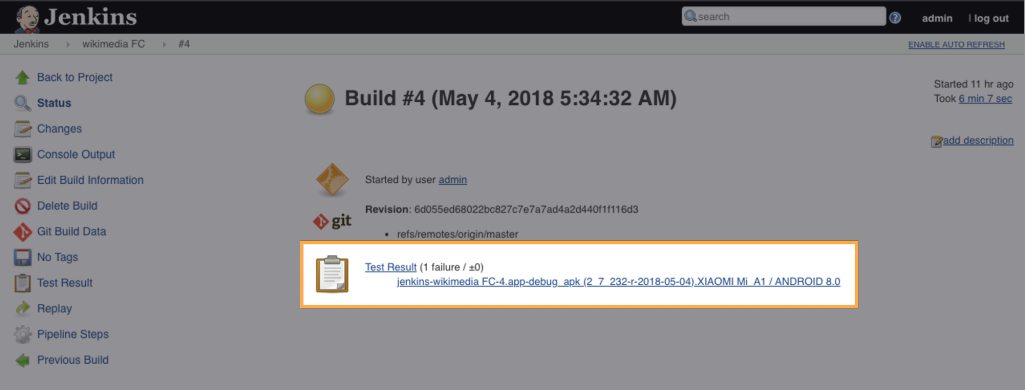
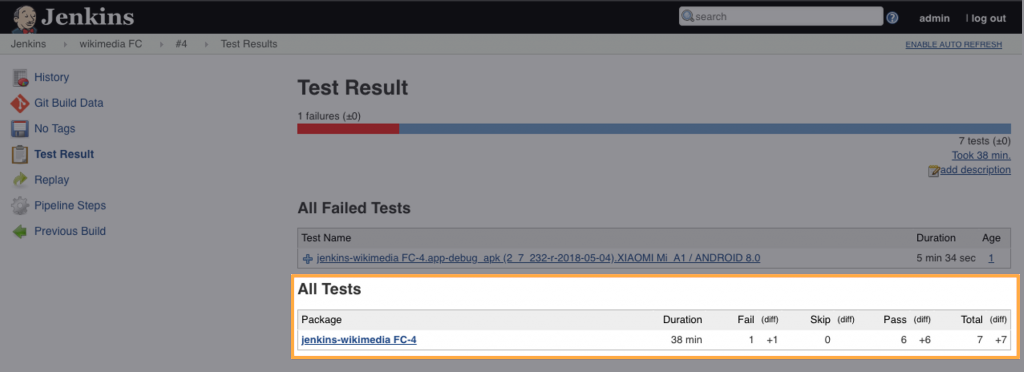
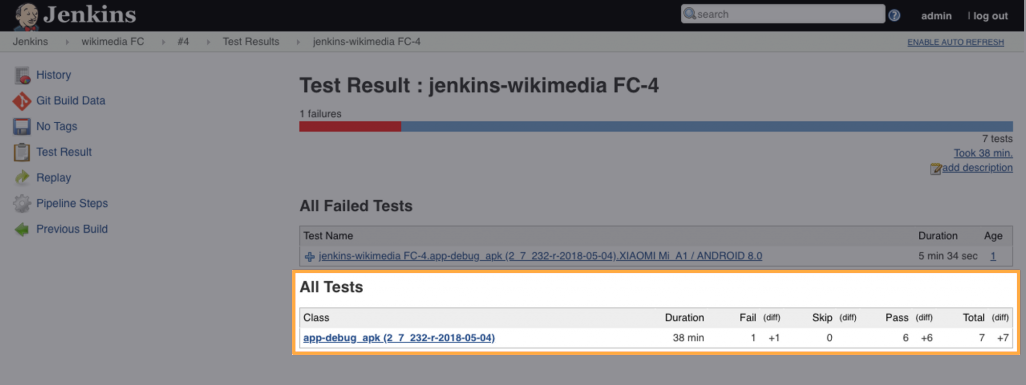
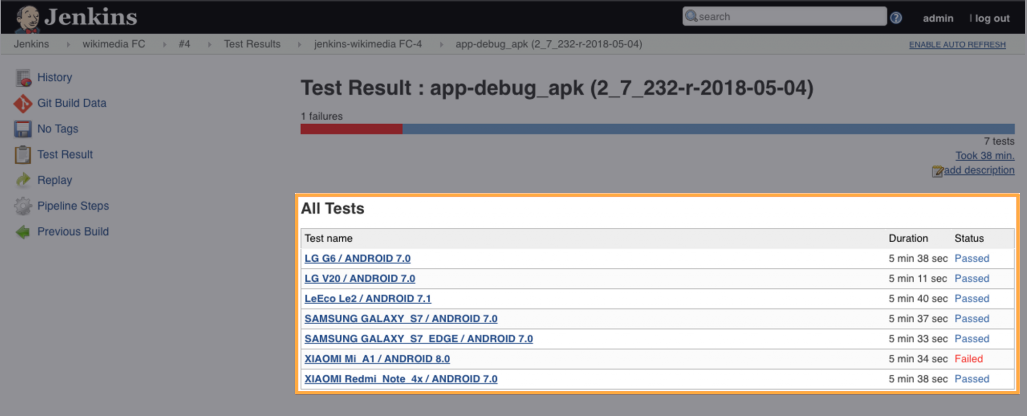
Once the testing is complete, the testing results in the JUnit XML result format are automatically passed onto Jenkins with a callback URL. Jenkins reflects the returned testing results.
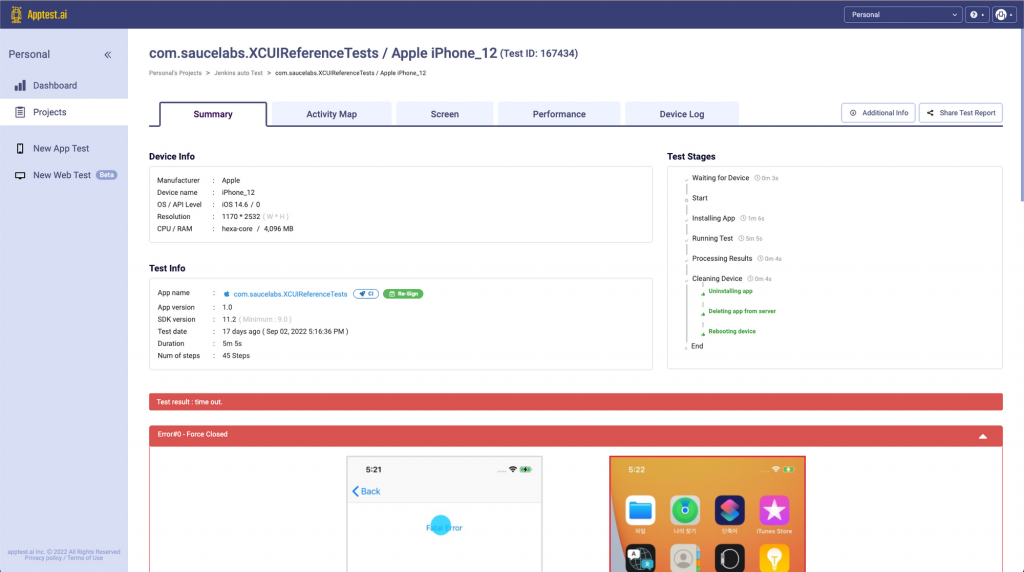
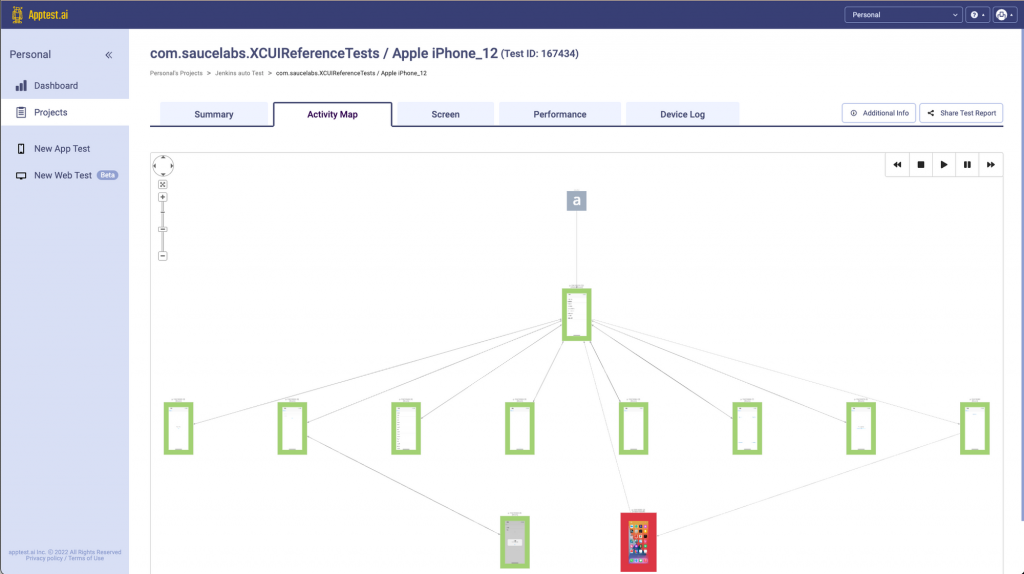
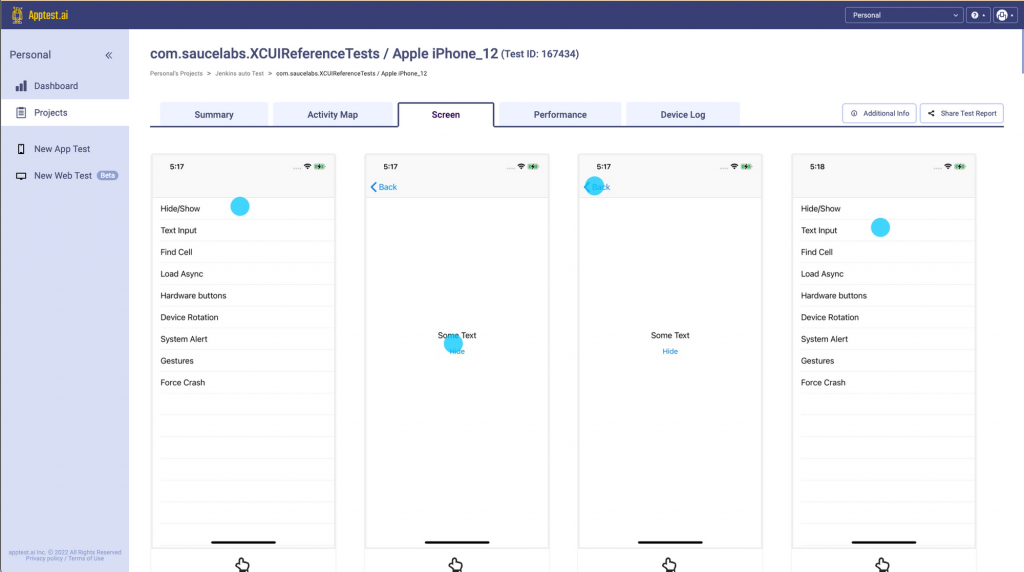
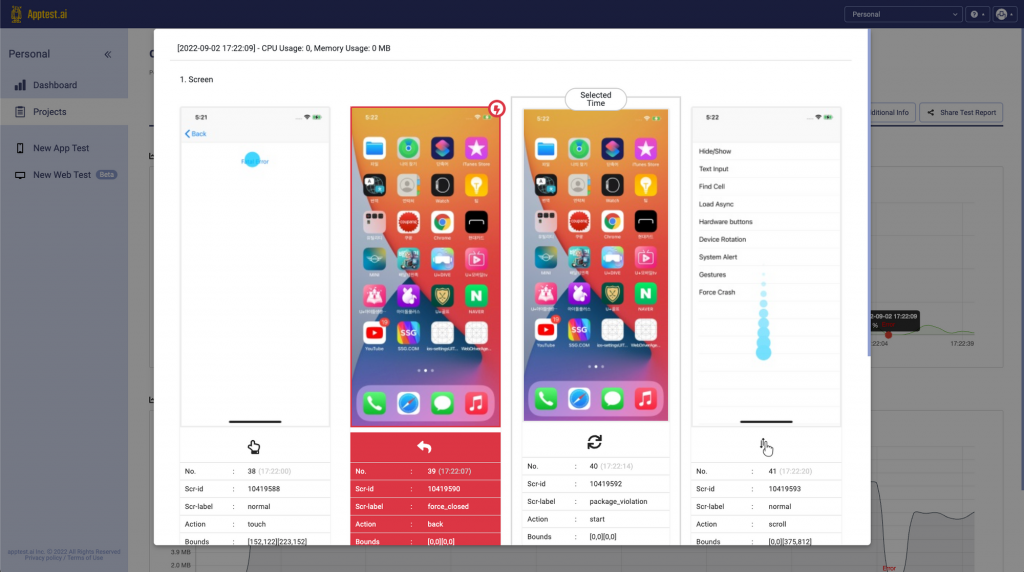
For more detailed analysis, please visit apptest.ai.
- View Testing Results in Jenkins
- View Testing Results in apptest.ai
